For a quick look check out my very first writeup
HERE.
Specifically relating to what I had to do to get enough radiator clearance to use the stock fan went through a few stages of build.
I first spaced the radiator forward
just enough on the bottom to clear my modded 3" crank pulley then installed an electric pusher fan on the radiator front.
I did quite a bit of research considering the stock fan rotation speed, blade pitch and diameter to estimate the CFM.
I came up with approx. 400 CFM.
This fan is around 600 cfm.
I later found out by surprise when I was stopping fast using the front brake, the front wheel dives to the point that the fender will hit the fan preventing the wheel from turning left or right. Not completely but I could definitely feel it. Not good.
The front fender now has marks in it.
I went around and around on this trying to decide which way to go.
I knew the stock fan was quiet, this pusher made an irritating whine when turning as a "pusher" but much quieter as a "puller".
To be a puller it would have to mount behind the radiator.
I tried all kinds of positions.
I even have a smaller one which still wasn't going to fit behind the radiator because of the thermostat housing and other problems.
I checked out high capacity puller fans, way too expensive.
I even had a brilliant idea of mounting 4-5 20MM computer fans on a custom mounting plate which I never did. Still have the fans though.
After considering all this I decided there has got to be a way to keep the stock fan so I set off to make it work in it's stock mounting location.
Here's a couple pics of my radiator as it sits now:
In order to get enough clearance for my 4" pulley and keep the stock fan I first thought moving just the lower radiator forward would be enough but I ran into some problems doing that.
When pulling the radiator forward the radiator filler neck would bind on the frame.
Even if I pulled it forward enough with the top mounts in place and loosened as much as they'd loosen the alternator belt would hit the stock fan mount.
After considering modifying the fan mount and still uncertain if I'd have enough clearance I decided to kill 2 birds with one stone by moving the
entire radiator forward.
I never actually thought to extend the filler neck tube like
Ernie did, which is a very good idea btw.
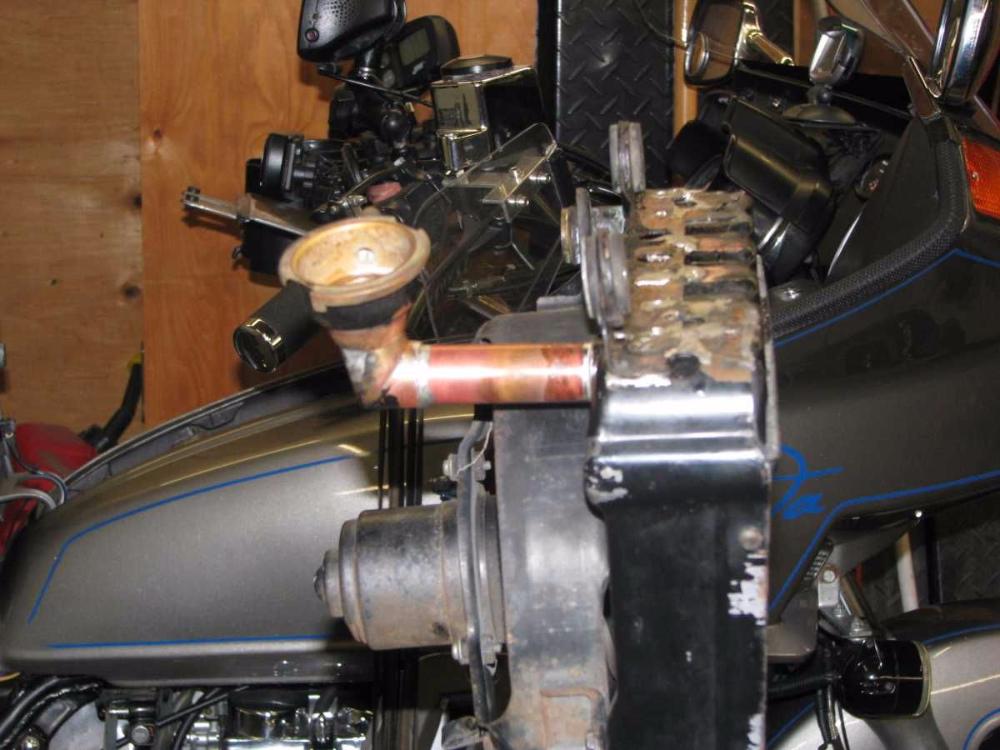
I decided since the rad cap is such a pain to get to under the false tank I'd move it to the front.
Low and behold there's a recess in the radiator front exactly opposite the rearward neck location so I drilled that out to accept a 3/4" house plumbing copper pipe.
House copper pipe is the same size as the filler neck tube btw.
Fitting the neck to the front was a pretty easy deal.
My solder job isn't pretty but after over 10k miles in the hottest weather it's holding fine with no leaks.
Had to modify the angle for the lower radiator hose also.
Time to get cleaver mounting the radiator.
I used conduit clamps after cutting off the original radiator threaded mounting studs from the frame.
I think these clamps are for 1" emt, would have to verify that.
Can get them at the home centers real cheap.
Using 1/4" threaded rod it was just a matter of trial fitting and measuring the threaded rod needed for all 4 mounts, cut and lock down with nuts and washers.
All that was left is fit the lower and upper hoses and relocate the horns.
I found a hose at Kragen auto parts with the right bends and long enough I cut for the upper and lower.
There ya have it.
That's how I did mine.
There are more various pics
in my gallery.


