Bertha's Single Carb Conversion Chapter Deaux Plus a major transplant revival

Classic Goldwings

Help Support Classic Goldwings:

This site may earn a commission from merchant affiliate links, including eBay, Amazon, and others.
So the solenoid that hangs down, near the fuel inlet (not the one inthe picture above). Do I pull that and plug the hole? Or do I pull it fill it with sticky epoxy, and then put the solenoid back in?
 
[url=https://www.classicgoldwings.com/forum/viewtopic.php?p=125535#p125535:rl2lhz12 said:
krakum1967 » Tue Jul 15, 2014 12:09 am[/url]":rl2lhz12]
So the solenoid that hangs down, near the fuel inlet (not the one inthe picture above). Do I pull that and plug the hole? Or do I pull it fill it with sticky epoxy, and then put the solenoid back in?

yes i tossed mine and pluged with stick epoxy... its basiclly a fuel bowl vent ... me think
 
I looked it over (that other cylinder/solenoid), and I don't think its vacuum related, and like Joe said, its really just an overflow bowl at this point, so I left it in there. I did remove that EPA vent panel, removed the diaphragm, filled the cavity with silicone, and make a full gasket to cover the hole. I also trimmed the little brass piece that vents to the venturi chamber to make sure my gasket cuts off any airflow there.

Also, I don't think its a vacuum issue, but it might be. Its at least a leaky area where dirt can get past the filter. But where the choke arm comes through the carb body, there are two pieces of plastic, one is a retainer, the other is the plastic slide that lets the choke arm move around. I removed the retainer,and shook the plastic piece with the hole in it out of the cavity. I filled that large hole with two vacuum port caps, and them lined the bottom and top of the seal with silicone. Like I said, its before the venturi, so its not technically a vacuum issue I don't think. But I capped the hole to prevent dirt from bypassing the filter.

Lastly I plugged the vacuum port that was behind the choke as weightlifter and 81 Wing pointed out. I am trying to eliminate leaks so I want to get them all, and I read what Joe had done on his, so I am taking care of that now.

I am still on the fence about drilling the butterflies, but I will test it first.

I will post picture later on, I am covered in dirt and gas again, and the wife says I am giving her a headache, so out to the shop I go again.

Now I am going to wait for sealants to dry, and test it tonight after the seals have dried up a bit. I also have to go collect a car payment on a car. This kid I sold my Bonneville to is being a real pain in the ass with his payments, and I am at my end of my patience with him. Think I will just repo it. I have a cash buyer who will pay full asking price in full cash. So it I am done with that.
 
This is true, but I read through some of the issues you encountered and figured I would do some heading off at the pass if you will. Since it was discussed, I might as well give it a shot. That cyclinder had a spring and v-tipped rod leading into it, so I left it. I will have to crack the top off eventually. Being I am running the 1000 motor, I am sure I will need to rejet at some point.

But for now, I am just trying to seal up all possible vacuum issues. Just a quick note on the one behind the choke. I can see where the channel comes out on the base, and you can see where it was pulling in air from the streaming it had on the gasket, so I am sure that is what I heard screaming like a dying mouse last night.

Oh, I used 1/8 inch rubberized cork felpro gasket material for the base gasket under the carb. I was not pleased with the way it looked after I pulled the carb today, so I went back to that rubber one that came with the kit. I am also changing the mounting bolts to standard bolts. The nuts are tough to get to with the added height. It puts them right behind the big bottom bar in the trestle that the shell surrounds. So the carriage bolts are going down the road. I may do the wood "lifters\" on the head to get the carb up that extra 5/8 of an inch to give me free access to the air idle screw and other items. I also had to adjust my mount for the throttle cable, since the carb was lifted, it was binding. I just removed the most interior bolt, and drill a new hole 1/4 inch higher to take out the bind and let the cable be free to move again. I saw how 81 Wing uses the unilink, so I may get that in the near future, but my round electrical terminal and vacuum cover are doing the trick just fine, and they are about 20 dollars cheaper after shipping....lol

But I like the Uni-link, its just on the "cant wait for my next check" list.
 
yep every job different and it sounds your making good moves ... i also notice some rubber doesn't do well ... cant wait to try out the leather gaskets i made for JYD .... personally i don't ever remove the carriage bolt deals till the whole tower is out of the bike on mine ....if my carb was turned the other way i am sure id be in a place that what working for me now wouldnt .... yes i say cover all the bases you can for your build ... i dont think anybodys so far is exactlly the same ...
 
Okay,, first the promised carb pics.

And, the results. It runs MUCH better. I get it to idle, I can make adjustments now. It only fell down or stalled 3 times out of ten test fires. Trust me...this is a HUGE improvement. I am definitely rich, I dont have to read them I can smell it, but at least I am getting a true read opf thje odors. The smoke (its a gas smoke) is way down, but it still smells rich. It is running cooler. And it responds to throttle. It will not throttle up cold, but it does idle.

So as I was getting close and dialing on the air/idle and on comes those annoying squeaks again. Like someone playing a trumpet without the horn. Real loud, high pitched, bouncing everywhere, low volume whistle. And then it became louder,,and then there was a harmony. Now either the oldwing is getting really good at alienish high pitched interpretive jazz, or I have an OBVIOUS leak. So I start tracing. With that loud of a whistle, I should feel it too. So I start following the noise and the vibrations down with my hand. Joints are fine, the woody is fine, all the carb joints are fine, the carb is fine, the noise is definitely right off the block, not in the block. SO I grab the number 3 runner rubber sleeve, and squeeze, and sure enough, I changed the whistle....so once again, krakum sits down, pulls up the tv tray, you know the one that has the fresh plate of "I was told this". Now I have to live with the choice I made to disregard it....lol...

Yep Joe, those wire lined runners are junk...do NOT use them. As they conduct heat (And they do, its was cool how it was heating the plenum) the wires inside heat themselves back to the surface of the rubber hose, causing micro slits in the rubber which whistle something fierce when all four tubes are kicking in....lol....yea, and as you torque down on the wire with the clamps, it cuts into the rubber too. So you can squeeze the clamps and cause it to whistle too. Now that the top end vacuum is good, I can hear these last (I hope ) leaks relating to the rubber hose I used with the internal wire. Yea, this is not good runner material in spite of being fuel resistant.

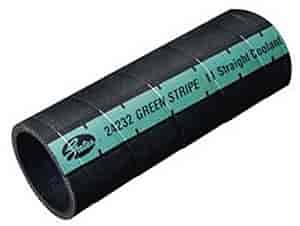
I need a good hose number for a 1.5 inch inside diameter radiator hose that I can cut into 4 sections, I would like 2 of those cuts to have like a 7 to 10 degree turn so I don't have to stress the rubber to get it to seal. Do you have any recommendations?

So tomorrow, I will get non-wired hose. I start road testing after that. I am excited, it feels very strong on the bench, much different tone than the original motor
 

Attachments

  • IMG_20140715_150516.jpg
    IMG_20140715_150516.jpg
    60.5 KB · Views: 124
  • IMG_20140715_153058.jpg
    IMG_20140715_153058.jpg
    93.6 KB · Views: 133
hmmm thats what igot on hooch radiator hose .. went to local auto parts store and went in the back where hoses were and picked one out that had bends and stuff and made all four runner connectors with it ... interesting story on wire hose ...
 
Its an enrichment circuit. It is added on to the side of the primary side. It seems that it is designed to add fuel at idle I believe from the little bit of reading I did on it. It has been reported by Joe and other sources that it can be the source of odd idle issues. To remove it or in this case plug it removes it from the circuit. It makes the carb more of a straight carburetor without all the added stuff that can clog, or potentially leak as it is diaphragm based. It reminds me of the accelerator pumps you see on the Keihin carbs they put of the CB900 or CB1000. Its on the same side of the carb as the fuel inlet, and sits behind that cylinder that hangs off that side of the carb. I will eventually pull that too, but the rod its connected to likely needs to be removed by removing the top of the carb. I will do that when I rejet.

I may be off base though, I pulled it to avoid issues as I am having a murphy's law kind of week.
 
Wire hose is bad joo joo. You should hear it whistle, drove my outside cat crazy, like he was looking for a dying mouse. That was the kind of squeak it was.
 
well ...on the wire filled hose as stated will not make a good choice as connector hose especially if it has to bend ... when this was being debated a while back i tried to say everyone was making to big a deal out of this for connecting hose ....on my bike there is very little exposed hose to the gas charge...the radiator hose has been on my bike for quite some time ...i have seen no problems with it ....job number one is to have no leaks ....people who are not even doing this work at all were voicing there opinions about hose rating as if was super important ....this is what led to using the wrong hose for connectors ... its not made to bend as much or seal as good as other hoses ...

i am going to use some wire hose soon but i have worked with it and know it is great to use if it is strait run ... and that what i am going to do with it .....

i dont see the radiator hose failing me but if it does someday ill replace it hooch is sealed tight with no leaks ... has plywood involved ...cereal box and rubber gaskets ... that i am going to replace with leather gaskets ... so you might say i dont care much about product claims and that BS crap ... and i do all my own testing as are all who are brave enough and confident in there ability to do for them self ,,, you have to watch out for the nay sayers that are not doing this work ... there opinions are empty :thanks:
 
[url=https://www.classicgoldwings.com/forum/viewtopic.php?p=125721#p125721:lgirwauf said:
canuckxxxx » Wed Jul 16, 2014 8:21 am[/url]":lgirwauf]
Is that a fuel hose?


well when i called sanels auto parts and told them what i was doing they told me to ues the 24224 hose. well i didnt know it wasent for gas till now, when i check the specs.
 

Latest posts

Top