


danf
Well-known member
Original thread posted by Roady- Carburetor Overhaul, GL1100
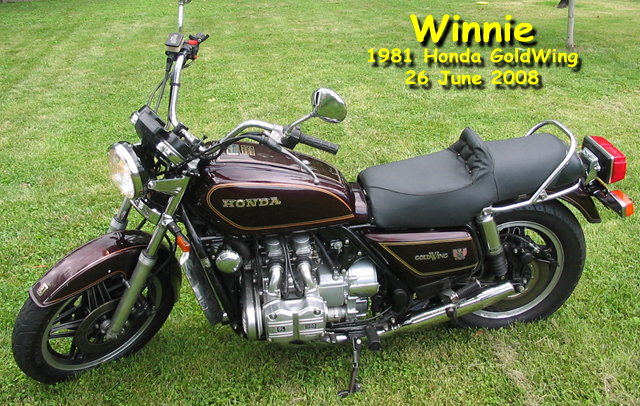
This is not a reinvention of the wheel. With so many excellent sources already available, this is intended to fill in some gaps and touch on some details of my '81 GL1100 carburetor overhaul.
Mechanic'in' is not my trade, that's graphic arts, computers and documentation. But I do know what a spanner is and have rebuilt a few carbs (VWs and XS1100). If you're like me you can take things apart pretty easy. Putting them back together is another thing!
Most manuals walk you through disassembly and then you get the famous, "Reassemble in the reverse order." That always gets me in trouble because I read left to right / top to bottom. Backward reading has always meant trouble.
The focus here is going to be cleaning and reassembly. For the rest, I'll assume that you'll be doing the Howard Halasz efficient and straightforward procedure as supplied by Randakk. You won't find that process here.
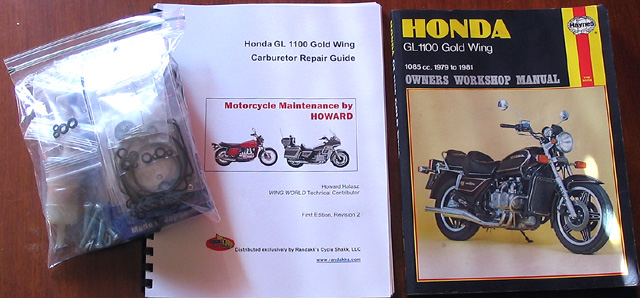
It would be foolish to rebuild your GL1100 carbs without using Randakk's GL1100 Master Kit Combo. This brilliant kit includes Randakk's GL1100 Master Carb Overhaul Kit and Howard Halasz' GL1100 Carburetor Repair Guide. I ordered mine Sunday night and had it on Wednesday morning, it felt like my birthday.
You could source your kit from the Honda dealer or through various websites but you'll be missing some valuable parts, get things you don't need (jets & needles) and parts that don't fit. Plus, you'll no doubt pay more.
While you're waiting for your Randakk kit to come, do my Carb Removal, GL1100 procedure, some cleaning, planning and as much reading as you can.
Valuable Resources
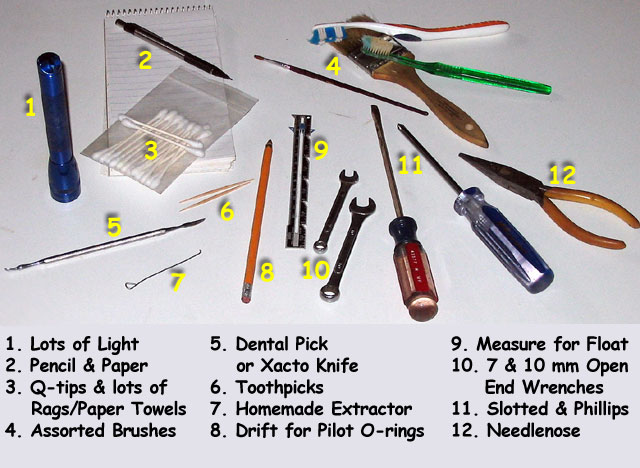
Tools. Use drivers and wrenches that fit tightly and you'll ruin very few screws and bolts. Treat yourself to a new, quality #2 phillips with a good handle. You'll also need a #3 phillips screwdriver and likely a pair of vicegrips.
Chemicals, solvents and sprays. Brake cleaner, carb cleaner, WD-40, PB Blaster, anti-seize lube, strong bathroom cleaner, whatever it takes to get the carbs clean. Lots of clean shop rags, paper towels, toothbrush, etc. Some aluminum-loving Carb Cleaner (like Yamaha Carb Cleaner, it mixes 1 part to 2 parts water).
Use gloves when you're working with these chemicals. Many are quite caustic ... the brake and carb cleaning fluids will devour rubber parts and can easily eat your skin.
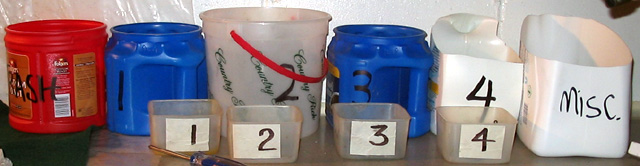
Tubs, containers and bins, Oh My! You'll need 10 or 12 of various sizes. Trash like Coffee cans, Orange juice and laundry detergent bottles. Plus small ones for the tiny parts.
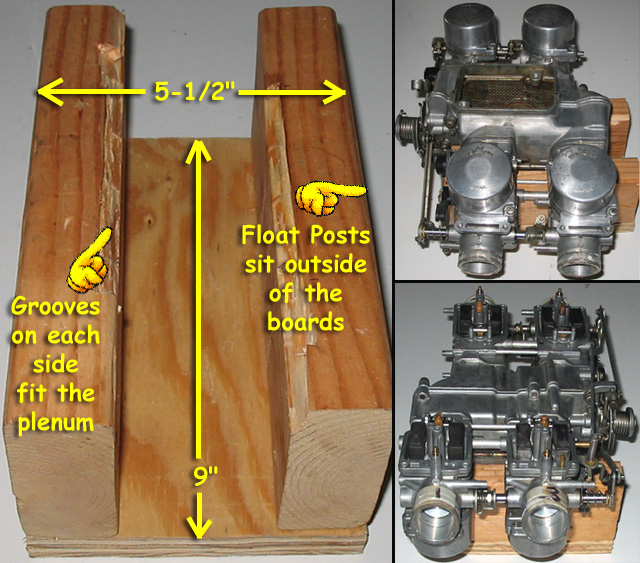
The Jig is up. This simple jig will hold the carb rack without denting any important parts or flattening the floats. It works whether the rack is right-side-up or upside-down. That patent application better go through soon.
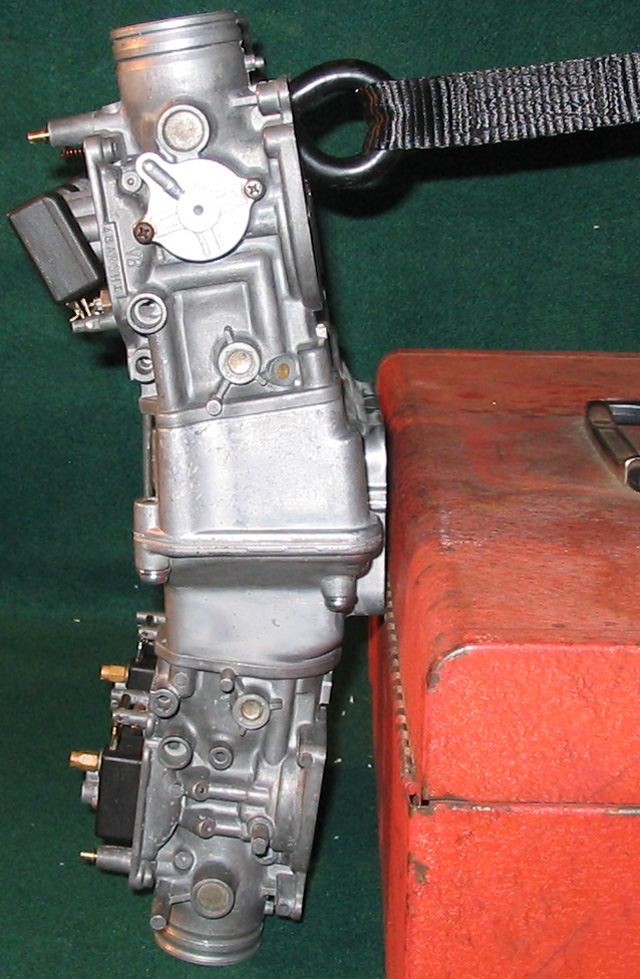
Compressed Air. Since this is Po'Boy talkin' here ... fancy air compressors are out of the question. So I butted this here up ag'in the wall and strapped it to the shelf.
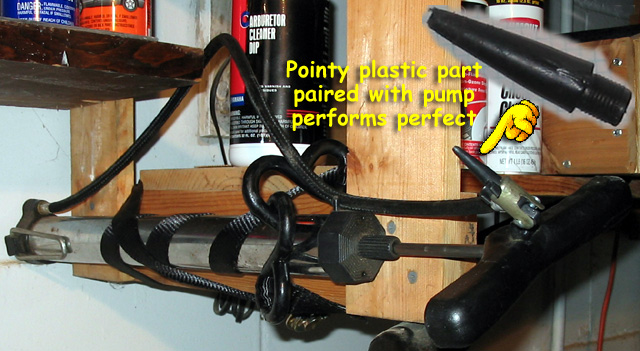
Lean into it with the shoulder and both hands are free.
Let's Get Down to It!
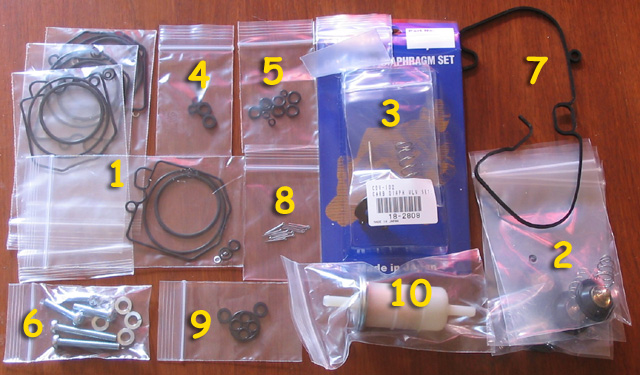
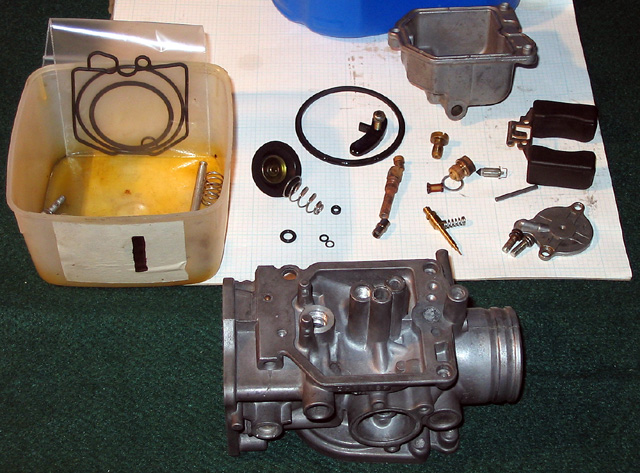
Randakk GL1100 Master Carb Overhaul Kit contents.
The Carbs have Left the Bike
Read the Carb Removal How-To to find out how that's done.
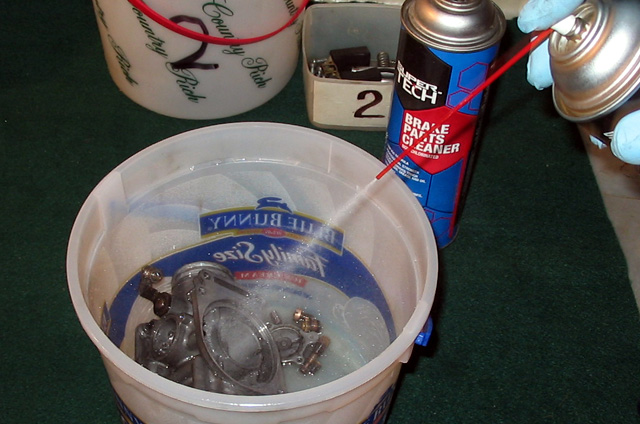
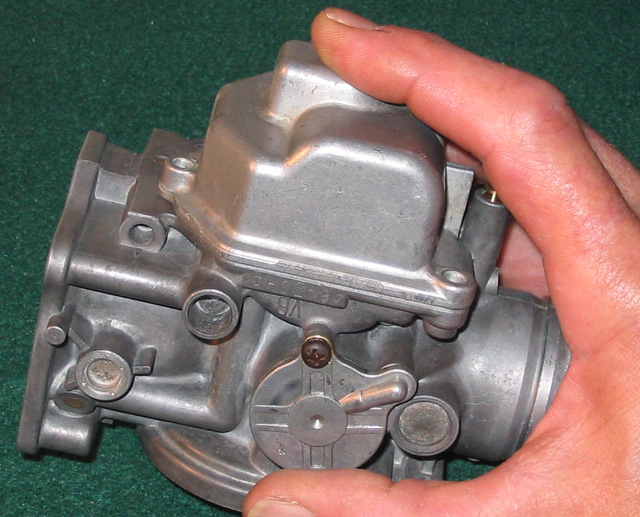
Clean up the outside with large doses of carb cleaner and brake parts cleaner.
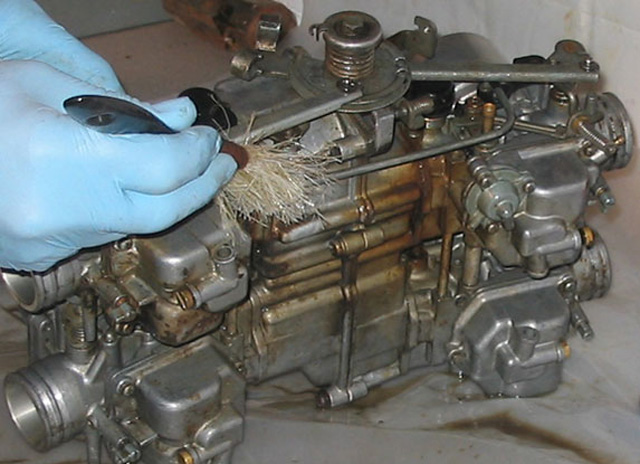
That's better. Now you can see what you're doing.

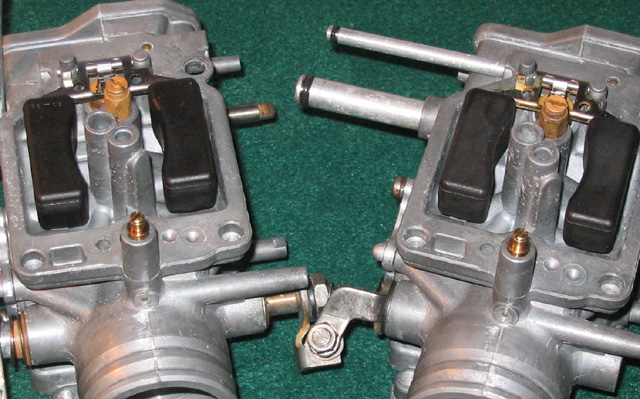
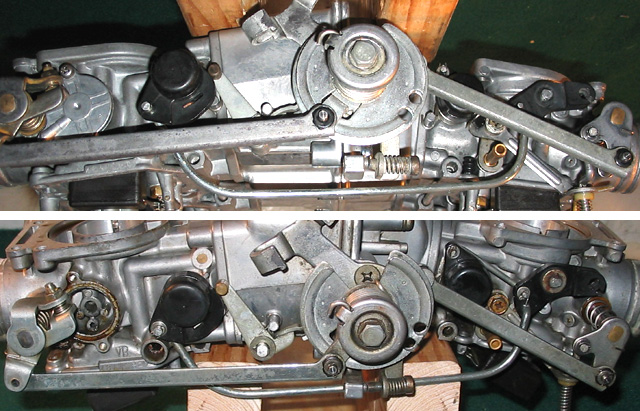
Follow the directions in Howard's book to remove some of the linkage. You don't want to take it all off unless there's a problem that needs fixing.
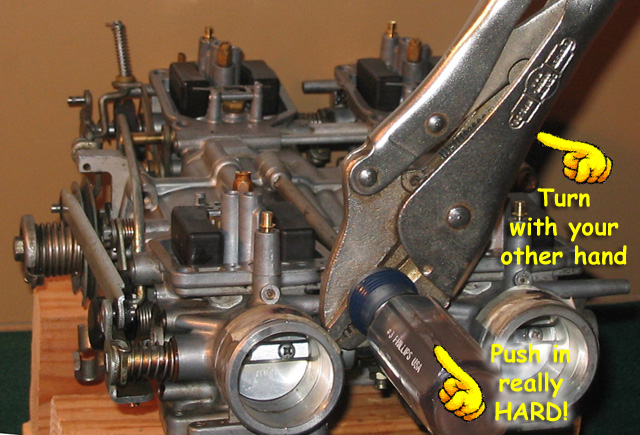
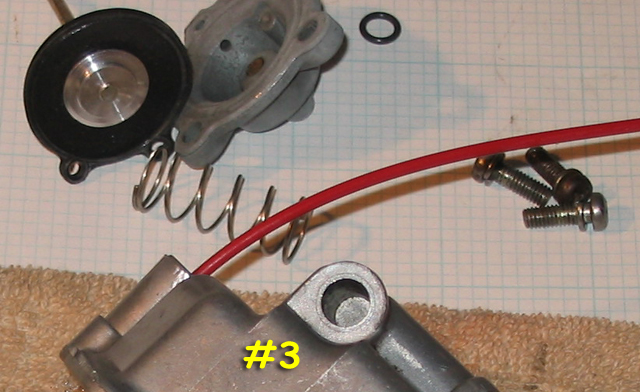
To separate the plenum halves you'll need a good, tight-fitting #3 Phillips screwdriver. If you can't move a screw, try clamping vicegrips on the shaft. Push hard on the screwdriver and turn with the grips. Works every time. Discard the 5 screws. Watch for the little straw!
Separate the carbs and screens from the plenum halves. Keep each carb's parts separate from here on out. Discard all o-rings. I had a special trash bucket for discarded parts just in case ... didn't need anything but I saved it all.
Work the carbs one at a time. Disassemble it, wash it and then soak in carb cleaner for a few hours or overnight. I liked the result from Yamaha Carb cleaner, mixed 1 part with 2 parts water. While the first is in the carb cleaner, take the next apart and wash it. Keep the assembly line in order so you don't mix up the parts.
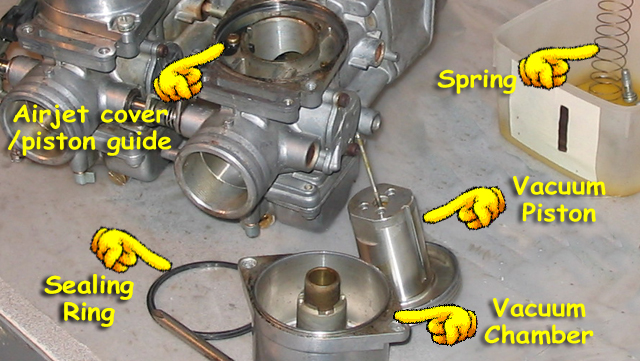
Remove the Vacuum Chamber, piston, sealing ring and airjet cover/piston guide (the black plastic part held in by a phillips screw, under the cover). Toss all removed parts into the soapy wash bucket.
NOTE: Pic is wrong, your carbs are separated now.
Flip the carb over and remove the 3 float bowl screws. I had a leak on the left, #2 & #4 side and the reason was obvious when I saw the smashed and cracking float bowl o-rings. But, I had done several soaks over the winter to try to clean the carbs so the bowls themselves were pretty clean.

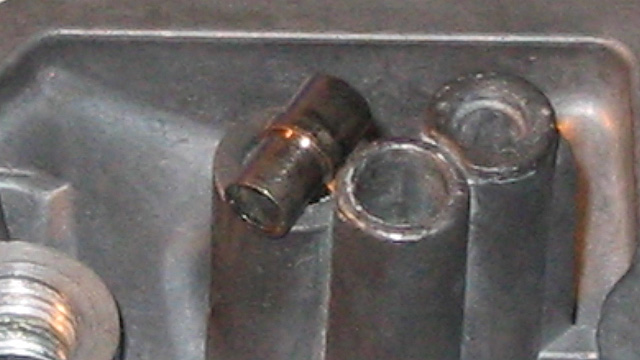
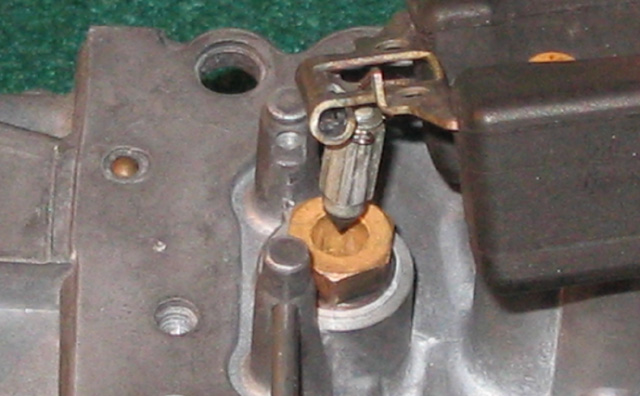
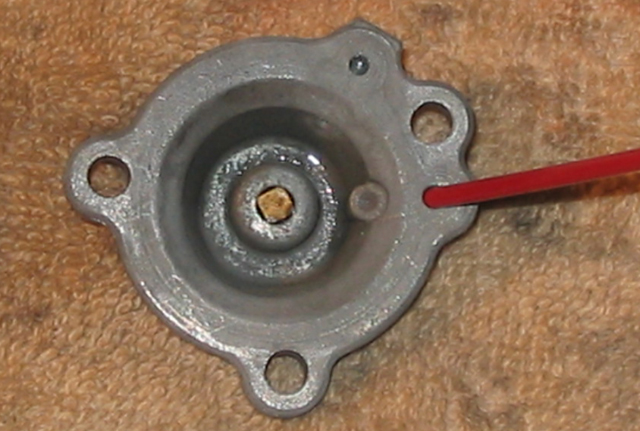
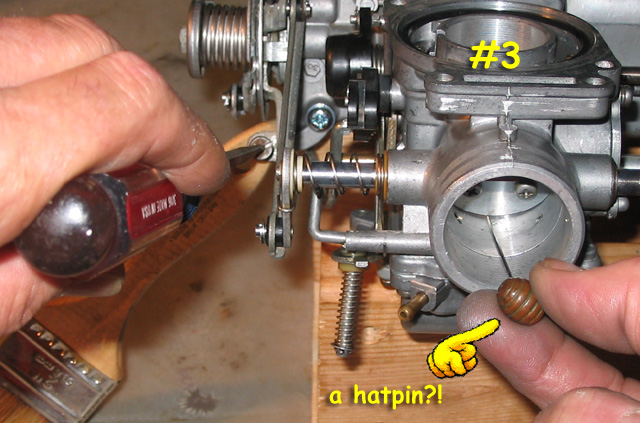
Here's what you'll see under #3's float bowl.
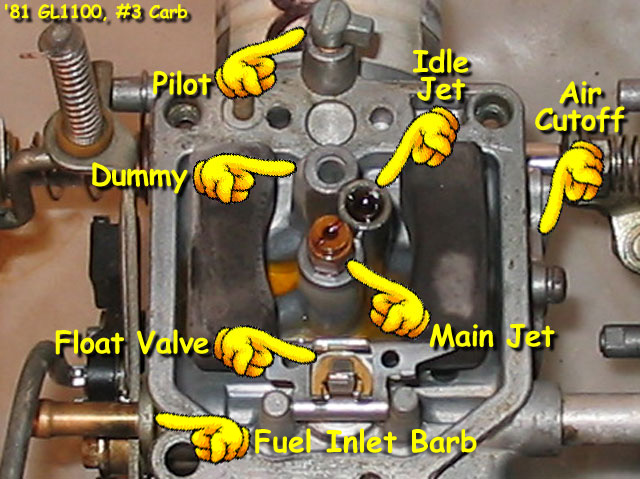
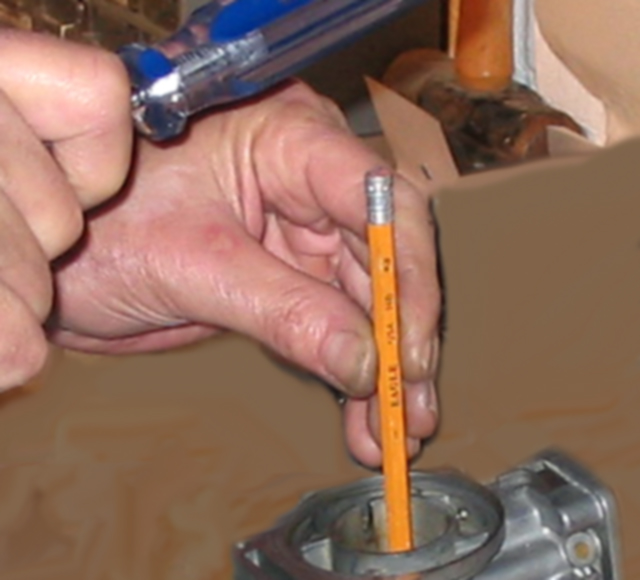
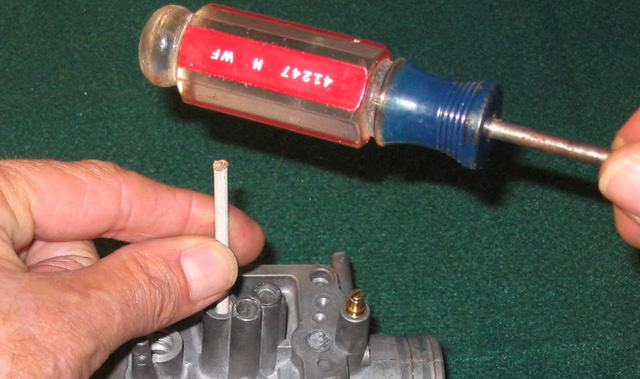
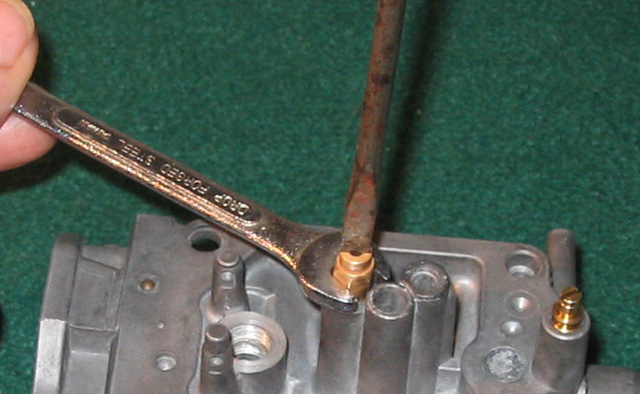
Unscrew the Main Jet. Secure the Needle Jet Holder with a 7mm open end wrench if it wants to turn too. Remove the Needle Jet Holder. Turn the carb over and use a suitable soft punch (mine's a #2 Ticonderoga) to knock out the Needle Jet from the vacuum slide side.
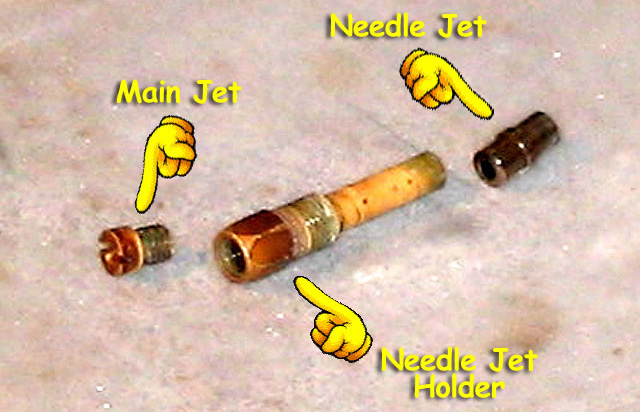
Parts from the Main jet assembly.
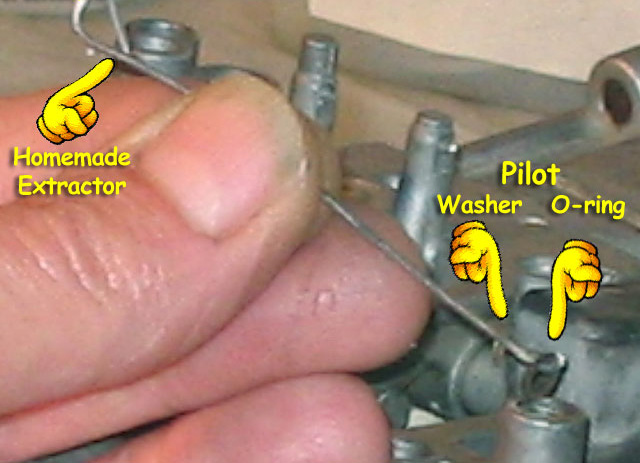
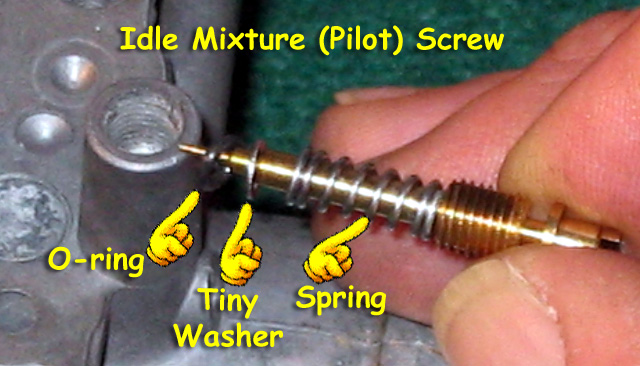
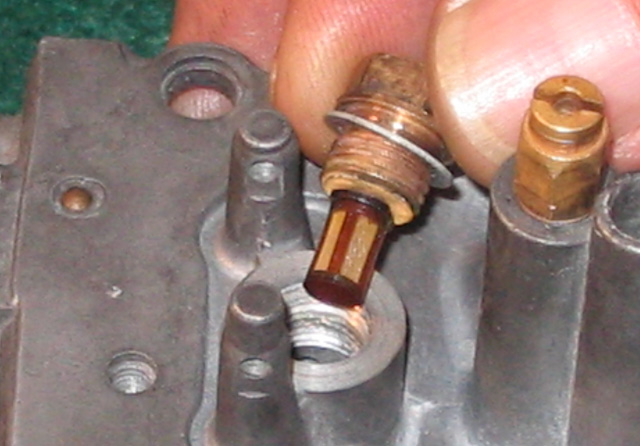
To get out the Pilot screw's parts you'll need to make a small hook tool. Remove the screw and spring. There is a tiny washer and an o-ring down in there.
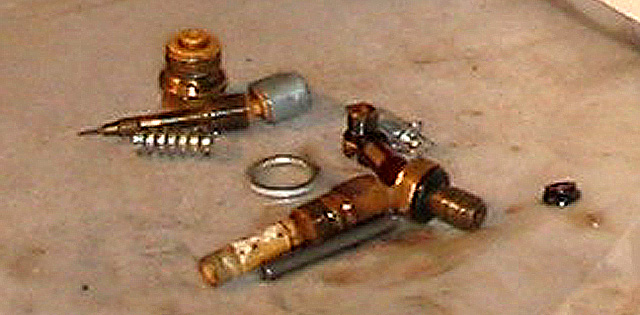
This is the pile of small parts you'll pull from the carb. Again, discard all of the o-rings. There is a replacement tiny washer for the Pilot and a Float valve washer so toss those too.
Now all of this goes into a soapy bath. Use a strong bathroom cleaner of some kind (my choice: BAM!!), put on your rubber gloves and scrub everything with a brush (not a wire brush!). Rinse and repeat until all greasy stuff is removed and you're getting happy.
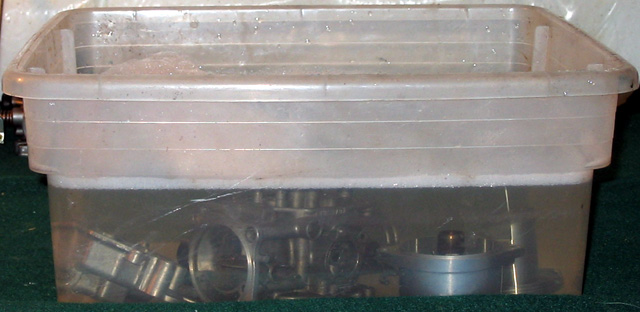
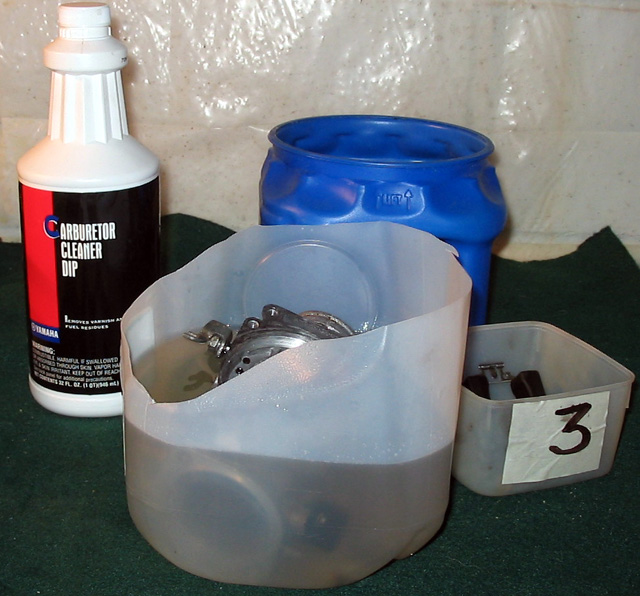
Then everything goes into the carb dip for a nice, long soak. Follow the instructions on the bottle. Do not use the stuff from the auto store, get either Honda or Yamaha carb dip and follow those directions. I soaked each overnight but that may have been overkill. Count the little parts that you put in to soak.
Note: Put the next carb's parts into the soapy bath.
Next day ... remove big parts and then strain the little parts.
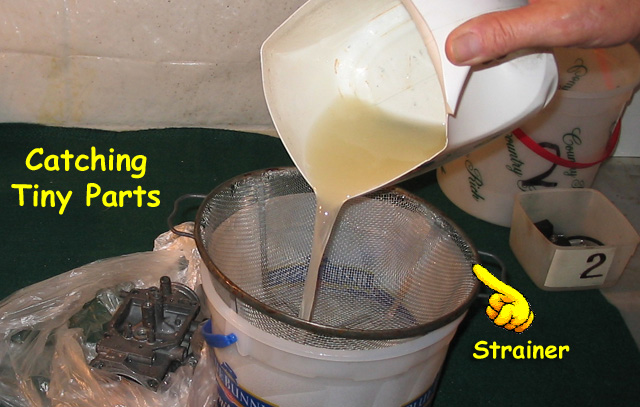
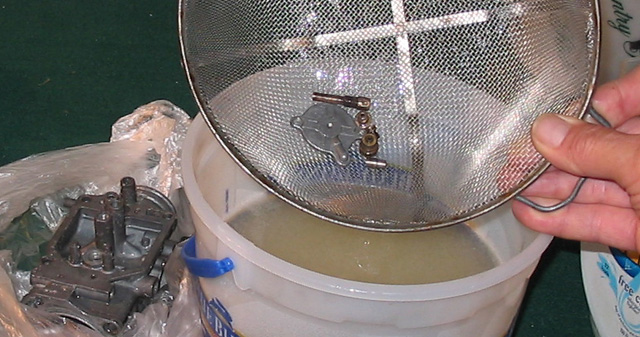
Count to make sure they're all present & accounted for.
There's those tiny buggers.
Note: Get another carb into the carb dip now.
Clean off the excess dip. Spray with carb cleaner or brake parts cleaner (or back to soap and water). Again, what do the directions on the carb dip say?
Look closely at all mating surfaces. Scrape (lightly) to remove gasket and o-ring gunk. Carbs are aluminum so be careful not to scratch the surfaces with your steel tools. Get the gunk out of all o-ring journals.
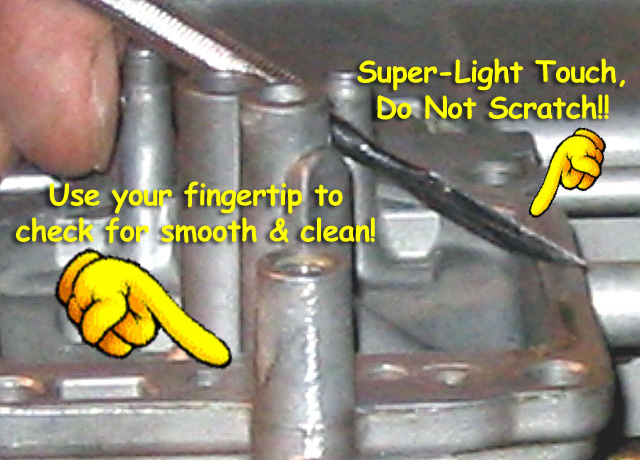
Repeat: Do not scratch the surfaces or you're looking at leaky carbs and will need to open them up again. Tough stuff will often come off with a concentrated spray from the brake parts cleaner. You can get big cans of this stuff from Wally-Mart for, like, a buck.
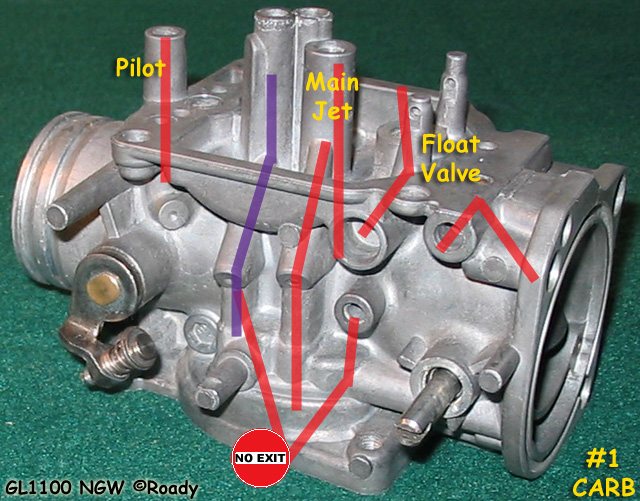
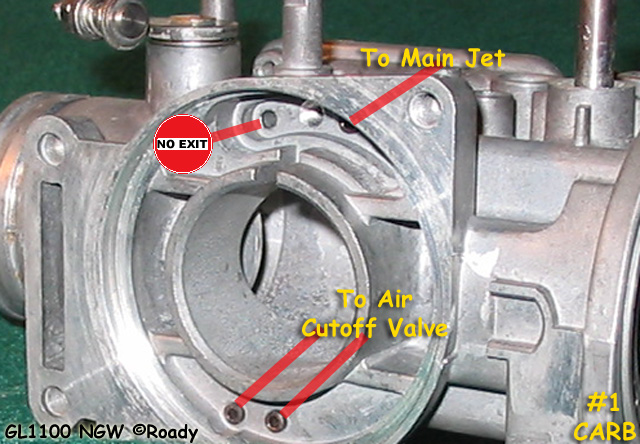
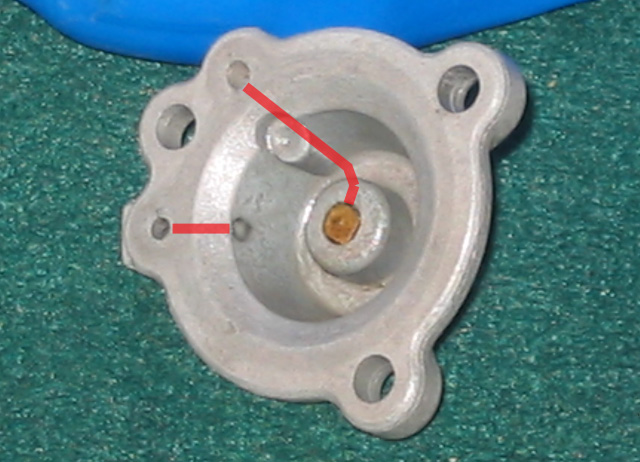
Now for all the holes and channels. Follow the red lines in these images as a general guide. Spray compressed air, parts cleaner, water-pic ... whatever it takes ... to clear out all of these. As Randakk says, "Everything Affects Everything," so make sure you clear all of these.
Plenum end.

Cutoff valve side.
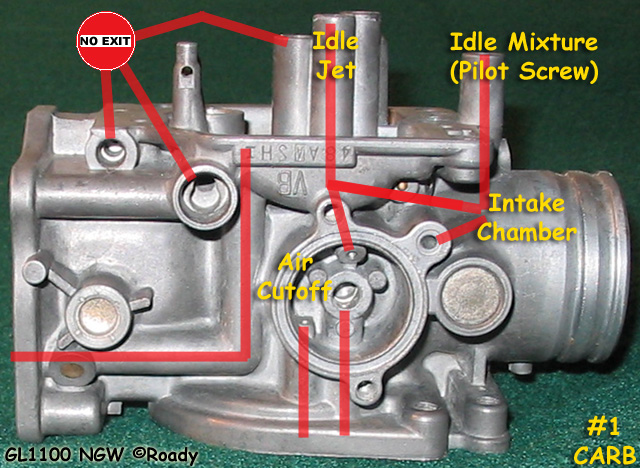
Throttle side.
Vacuum chamber/top side.
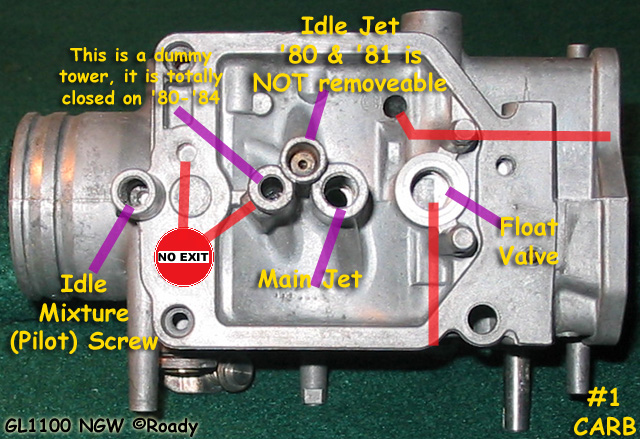
Float bowl, jets, bottom.
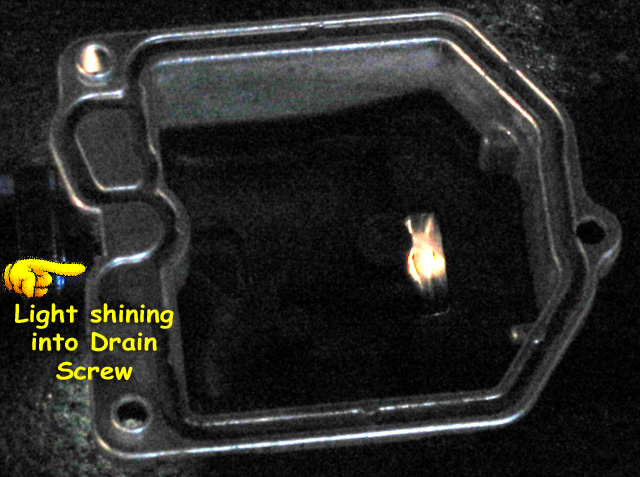
Float bowl drain.
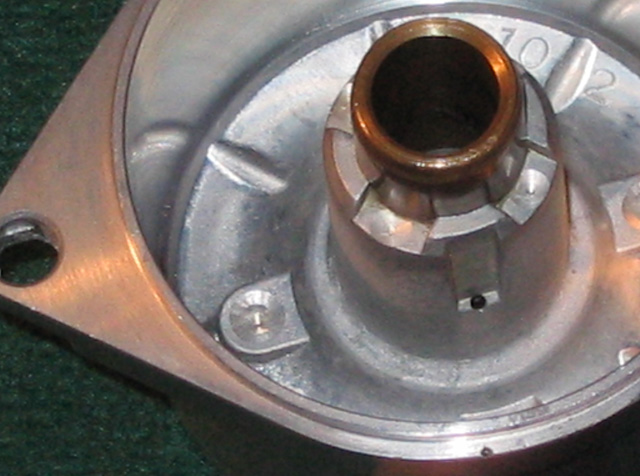
Vacuum Chamber. That little hole goes into the center where the slide fits. Clean it.
Cutoff valve cover has two channels to clean.
When you are more than satisfied with your cleanliness and starting to question whether anal-retentive is hyphenated or just two words ...
Take stock of the parts and arrange them for reassembly. Find all the necessary o-rings and new washers.
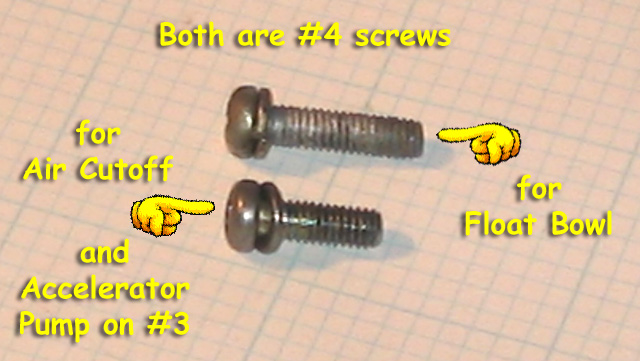
Do not mix up the float bowl screws, accelerator pump screws and air cutoff screws. They are the same size and thread but different lengths. Use a too-long screw and you'll be searching for a new carb body.
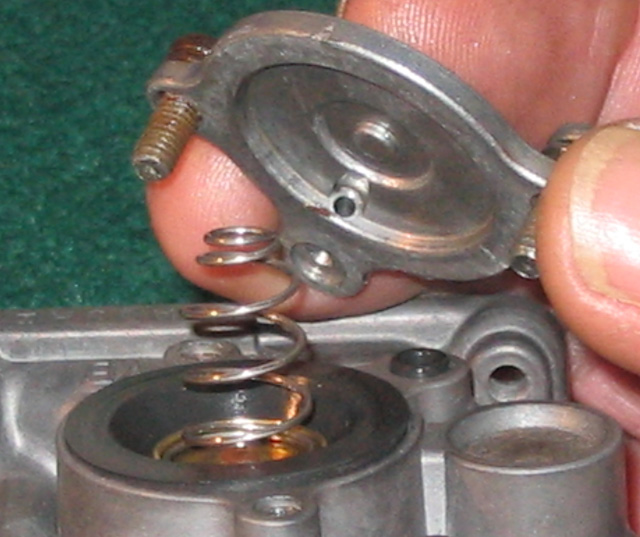
Assemble the Air Cutoff Valve. Line up the diaphragm; big end of spring goes down; small o-ring in place; top mates with knob in cover; tighten the screws.
Put the spring, tiny washer and o-ring onto the Pilot Screw. Turn the carb right-side up (vacuum chamber side up) and screw it in. Go in just until you feel it touch bottom, do NOT over-tighten. Then, back it off 1-1/4 turns ('80-'81), 3 turns for '82-'83.
Needle Jet goes in next, open end (looks like a tube) goes toward the vacuum chamber, convex end toward float bowl. Drop it in and line it up.
Tap lightly with a wooden drift/dowel to seat it.
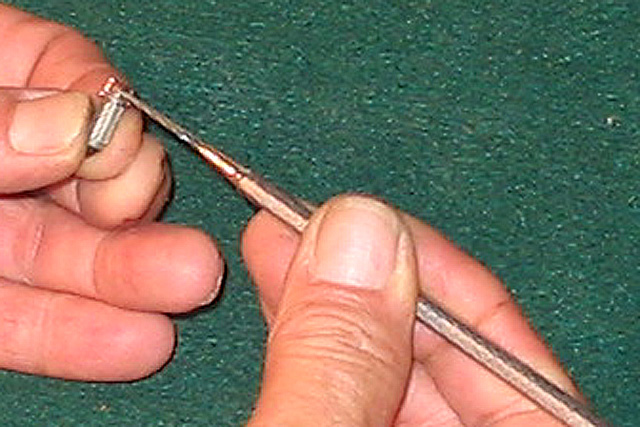
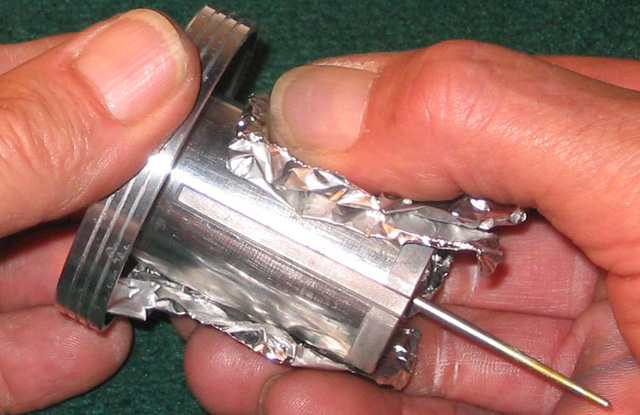
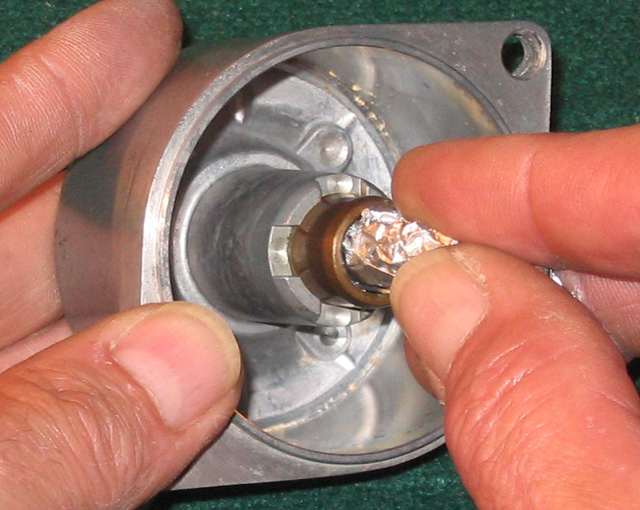
Then the Needle Jet Holder. Double check the twelve little holes to make sure they are clean, clean, clean. Hold it up to a light and peer through to the other side to see.
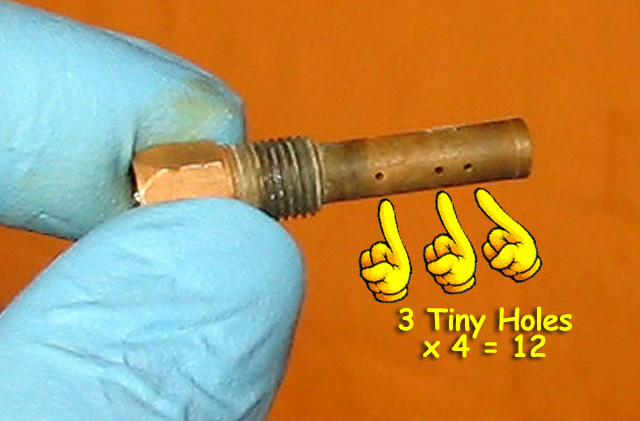
And clean out the inside with a bit of light aluminum foil.
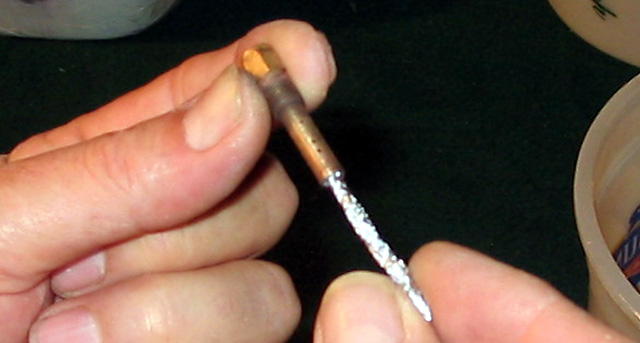
I just loves makin' tools.
Screw in and tighten the holder; then the Main Jet..
Put the washer and screen onto the float valve holder. Turn the carb right-side up, slide it in and tighten.
Ensure that the float valve/spring moves freely.
Make sure that the float pin moves freely in it's hinges. Clean the hinges with foil or a small file, it must move smoothly. Install the valve and slide in the pin.
Install the float Drain Screw with its new o-ring.
Attach the Float Bowl, do not install the o-ring/gasket and just finger tight on the screws. You'll need to set the floats after the carbs are assembled.
Onward and upward to the vacuum pistons. Clean and smooth is what you want here.
Use lightweight foil to buff the Piston body ...
... in here too ... NOTE: yep, plug should not be in yet.
... around the edge ...
... inside Carb Body ...
Note: another bad pic! Airjet Cover/Piston Guide and Sealing Ring should not be installed yet.
... inside the Vacuum Chamber ...
... and don't forget, down in here ...
Then clean, clean, clean all the newly buffed parts. Again with the brake/carb parts cleaner and compressed air.
Install the plug with its new o-ring into the slide.
Compare the length of the springs. They should be equal.
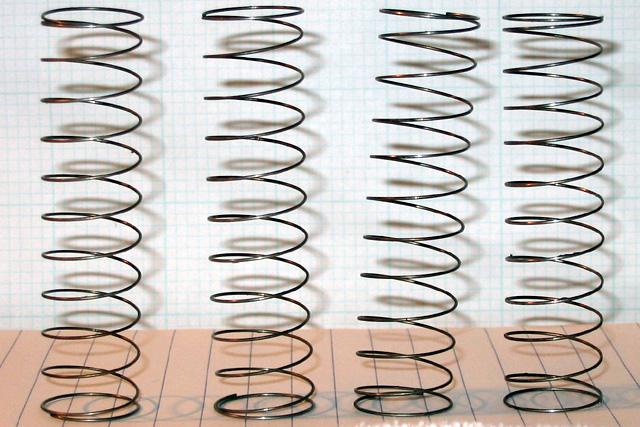
Put the four Vacuum assemblies together and place them upside-down on the bench. They should move freely and settle to darn near the same height.
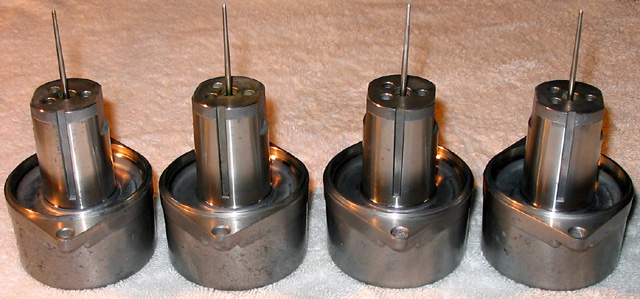
Do NOT mix these up! They are paired with the carbs.
Screw down the Airjet Cover/Piston Guide. This screw is another close match to the cutoff and bowl ones. I didn't separate these from their plastic covers during the overhaul.
Press in the Sealing Ring, flat side to carb body.
Install springs, pistons and caps on #2 and #4. Leave them off of #1 and #3, those are installed after the carbs have been put back in the bike.
Specials for Carb #3
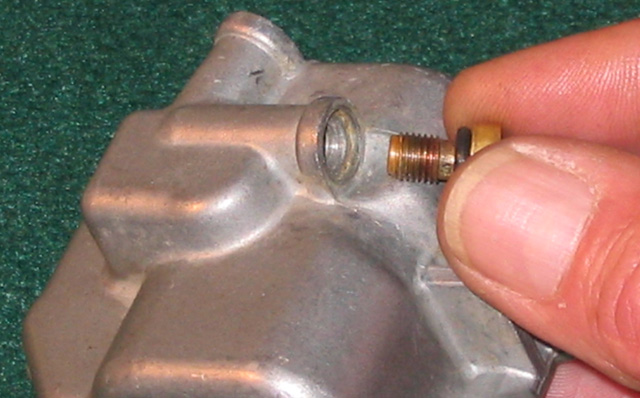
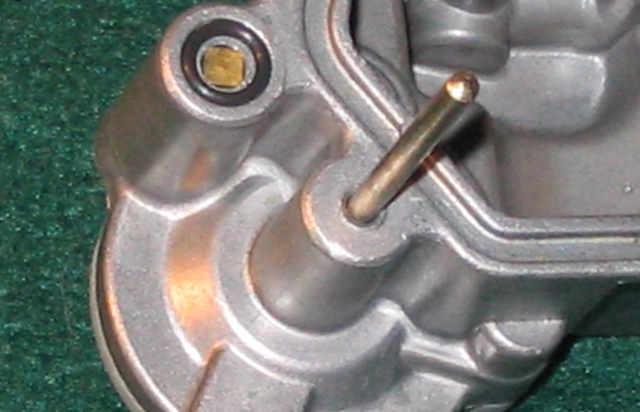
If you haven't already, remove the Fuel Inlet Port, clean it all up and replace the two o-rings. You may have to remove the linkage that's blocking access.
There's a lock washer behind the hold-down bracket.
This is not in the book. Randakk pointed me to the correct section on his Tech Tips page and I had to do this after the carbs were all attached to the plenums. Not fun that way.
It goes back together as shown here.
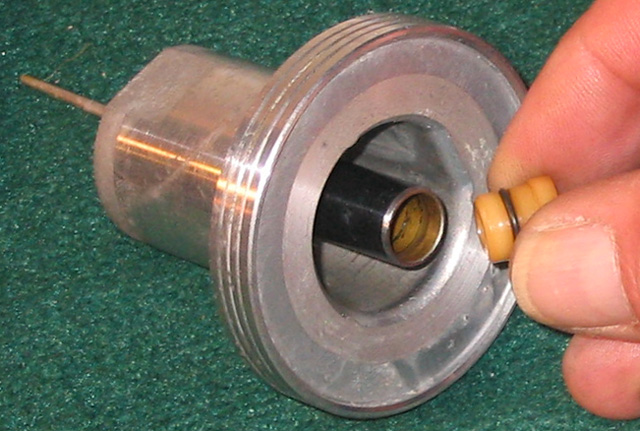
Accelerator assembly: clear all of the holes in the carb.
Clean out the holes in the cap, much like those in the Air Cutoff covers.
Install the diaphragm, spring and cover. Don't forget the little o-ring (in separate, attached baggie, toss other one) or she'll leak. Put a little grease on the shaft and slide the gaiter onto the shaft.
Special for Carb #4
Sorry, no image of this ... Attach the choke lever with the new cotter key.
Final Assembly
Collect carbs #2 and #4, fuel tubes, springs and o-rings.
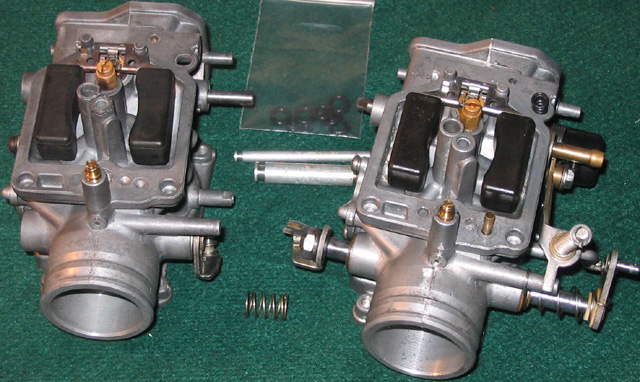
Put the o-rings on the tubes and slide one end of each into one of the carb bodies. Note: Float bowls should be on.
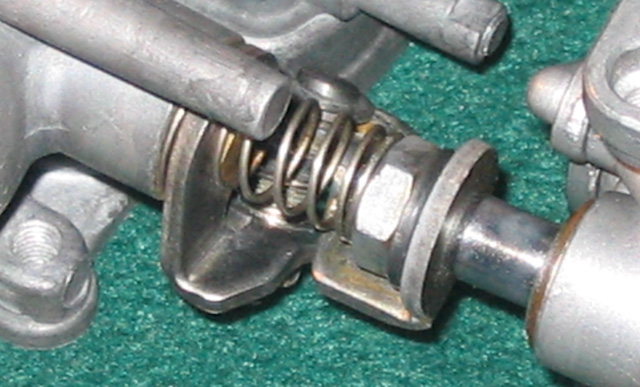
Loosen the sync lock nut and screw all the way. Slip the accelerator linkage together, between the two washers. Make abso-F'in-lutely sure that there is a washer above the linkage and one below.
Slide in the spring. Take a close look.
Spring in position. Are you certain that the linkage is fitted BETWEEN the two washers?
Push the carbs together being careful not to bend the tubes.
Repeat that for carbs #1 and #3.
Refer to Howard's book for this next step. It's important that the Li'l o-ring and Bigger o-ring are placed in the correct holes or again ... leakage.
Install the large carb to plenum o-rings.
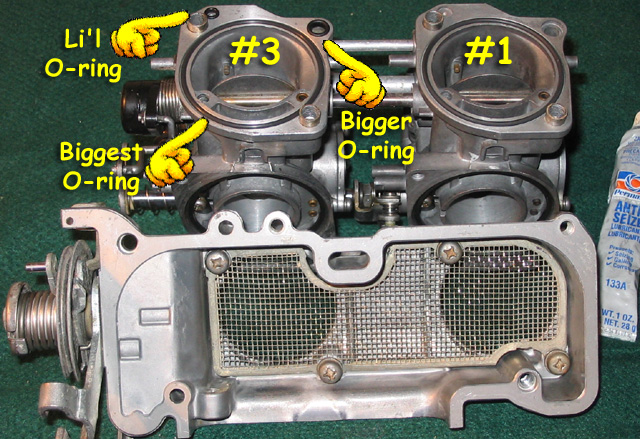
Sorry, no image for #2 and #4. The two small o-rings go one on each carb, same side and close to each other. Next time I rebuild a set of 1100 carbs (wayyyy in the future) I'll add a pic, promise.
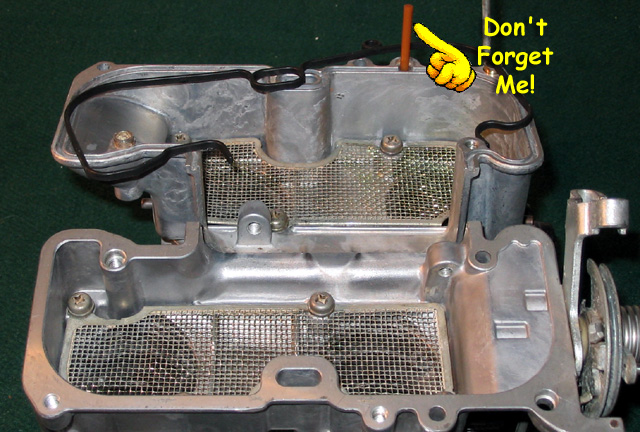
Remember that straw? It's time to put it in its hole.
Put the beautiful new plenum gasket in its journal and mate the plenum halves.
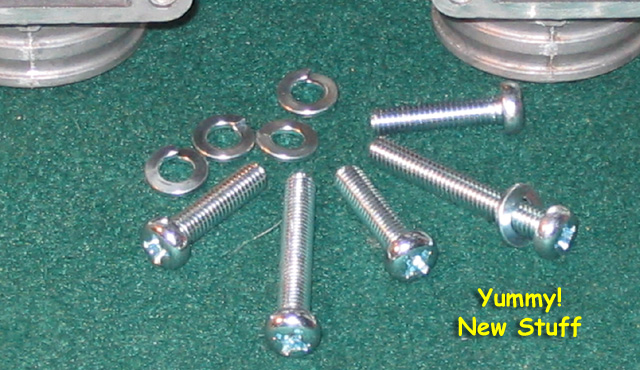
Oh, boy! New plenum screws!
Don't forget to include the Choke Bracket under the one by carb #3 before you tighten it down. Don't ask.
Assemble the linkage with the new cotter keys. If you replace all of the keys you should end up with one leftover.
Moving right along and getting close to done.
Time to set those float levels. Remove the float bowls. Stand the carbs up with the intakes secured. Rubber furniture coasters work good ... just don't let the assembly slip and crash to the floor (no I di'nt).
The angle you want is where the floats have just settled on the valves but are not compressing the springs inside.
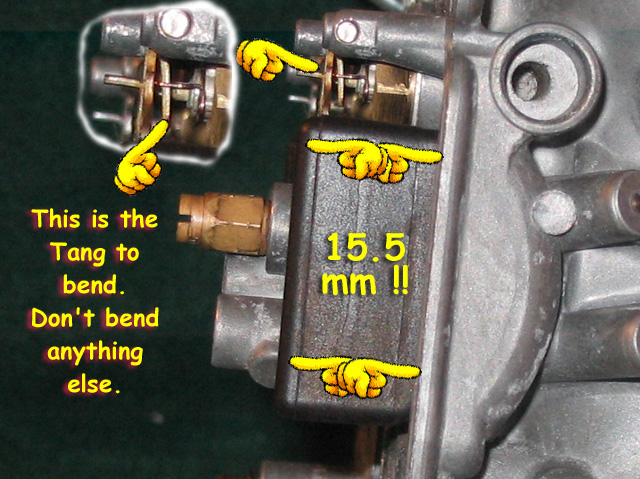
Measure from the bottom of the float to the gasket surface. It needs to be 15.5 mm along the entire length. Mine were correct near the valve but about 12 at the lower (as in pic) end. Bend the tang to adjust. See the blowup inside the pic below? That is the tang. It's in the center of the hinge and bends without a whole lot of force.
Do avoid bending where the floats are attached or anywhere else.
You may proceed when the floats are perfect.
Put the new o-rings on the Float Bowls, tighten the screws.

Now for Alley Kat's Bench Sync.
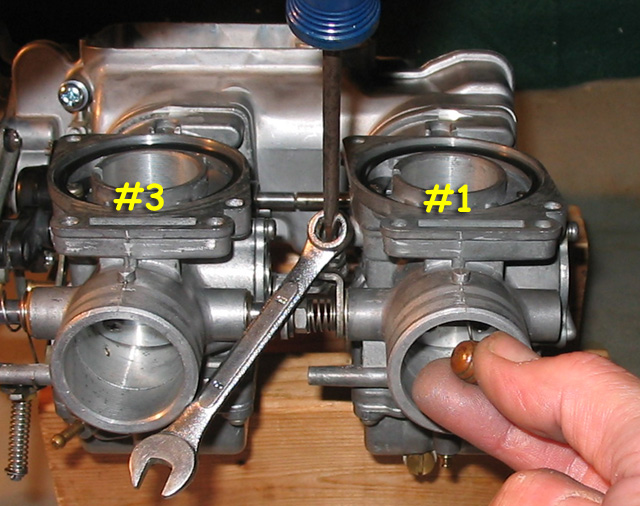
Get a nice smooth piece of wire or a long pin to use as a feeler gauge. Adjust #3 carb with the throttle stop screw so that the wire slides through the top and/or bottom with a little resistance. You'll need to prop the idle adjusting screw out for this (see the paint brush handle?).
Adjust carb #1 to match, checking top and bottom.
Rotate to the other side and adjust #4 carb with the sync screw on the right.
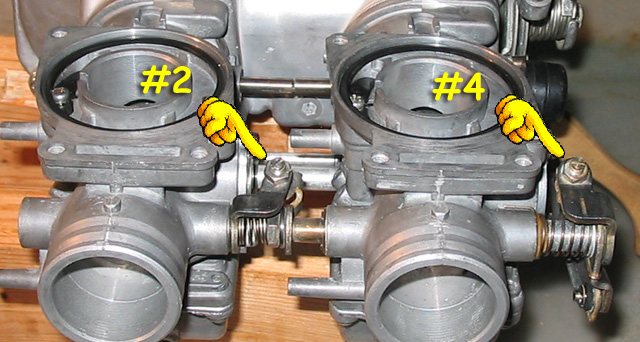
Adjust #2 to match.
Repeat from the start and double check. This will be a pretty good starting point for your future running sync.
Use a syringe to fill the carbs with gas through the fuel inlet fitting. Test it by rotating the throttle and watching for gas spritzing into the carbs. Check that all of the choke and throttle linkage works smoothly.
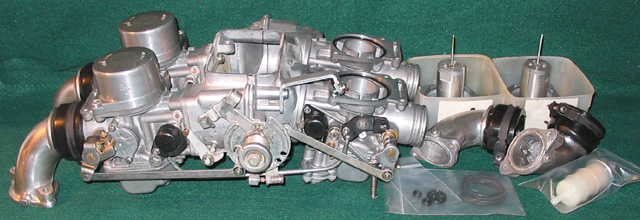
Ready to go back on the bike.
Now, the famous line, "Reassemble in the reverse order" in the Carb Removal, GL1100 procedure. Also, Howard's book has some excellent advice on the installation procedure.
Here's a new (26 Sept. '09) tip on tightening the clamps on the rubber intake runners. When everything is buttoned up and you've got the bike running and well warmed up, re-tighten the ring clamps. With the rubber warm you should be able to get almost an extra turn on the screws. This will reduce air leaks at that connection.
Synchronicity
Everything worked out good for me with all of the bench syncing and such. She started right up on the first crank and ran like a dream (sort of). Check out my Video in the Dark below to see the first minutes of the startup.
[flv]https://classicgoldwings.com/forum/vids/Winnie's%20New%20Carbs.flv[/flv]
After that, the fine-tuning was somewhat of a circus.
There's a special tool required to adjust the Pilot/Idle Mixture screws called a Pilot Screw Adjuster (imagine that?!). Motion Pro has them, starting at $29.99 and going way up from there. I rode down to the Honda dealer and pal'ed up with a mechanic who let me borrow his brand-spankin'-new, never been used, $125 tool.
[EDIT=17 Oct. '09] I finally ordered the tool from Motorcycle Superstore.
Link to it in their online catalog.
To adjust the screws, you must first get a black marker and score through the Idle Drop procedure outlined by Honda in their manual. To meet emission standards, Honda developed the idle drop method and it ensures that your bike will run lean at idle. Not good.
Puffy75 advises us to do it differently. This will get you a better idle and quicker warm ups.
First, attach an accurate, external tachometer. Warm up the bike and set the idle to 950. Pick an idle mixture screw and turn it in/out to achieve the highest RPM. Leave it there. Reset to 950 RPM. Do another screw. Repeat until all 4 have been set.
Then do a sync and you can come back and adjust the pilot screws again if you like. [/EDIT=17 Oct. '09]
As for vacuum sync ... well ... I spent quite a bit of time making a homemade manometer. Only spent about $10 but it just didn't work for me. I think my tubing was too small. When I started the bike, all of the Marvel Mystery Oil got drawn out of the tubes and into the intakes. That sucks. I ended up getting in touch with Ritalz through the NGW Club who let me come over and use his set of mercury sticks. Definitely the way to go. For more info on how to sync 'em, do Randakk's Carb Synchronization Procedure. After my sync, she runs much better ... check out the video below taken a few days later. Those Harley mufflers really changed this old gal's personality.
[flv]https://classicgoldwings.com/forum/vids/Winnie's%20Runnin'.flv[/flv]
There you go. All done!
Now, get out there and RIDE!
Click Here to get the printer friendly PDF of Carb Overhaul, GL1100.
Foxit PDF Reader FREE, small, quick: replaces Adobe Reader (2.6 MB, Windows only)
Roady, 30 June 2008
With help from:
This is not a reinvention of the wheel. With so many excellent sources already available, this is intended to fill in some gaps and touch on some details of my '81 GL1100 carburetor overhaul.
Mechanic'in' is not my trade, that's graphic arts, computers and documentation. But I do know what a spanner is and have rebuilt a few carbs (VWs and XS1100). If you're like me you can take things apart pretty easy. Putting them back together is another thing!
Most manuals walk you through disassembly and then you get the famous, "Reassemble in the reverse order." That always gets me in trouble because I read left to right / top to bottom. Backward reading has always meant trouble.
The focus here is going to be cleaning and reassembly. For the rest, I'll assume that you'll be doing the Howard Halasz efficient and straightforward procedure as supplied by Randakk. You won't find that process here.
It would be foolish to rebuild your GL1100 carbs without using Randakk's GL1100 Master Kit Combo. This brilliant kit includes Randakk's GL1100 Master Carb Overhaul Kit and Howard Halasz' GL1100 Carburetor Repair Guide. I ordered mine Sunday night and had it on Wednesday morning, it felt like my birthday.
You could source your kit from the Honda dealer or through various websites but you'll be missing some valuable parts, get things you don't need (jets & needles) and parts that don't fit. Plus, you'll no doubt pay more.
While you're waiting for your Randakk kit to come, do my Carb Removal, GL1100 procedure, some cleaning, planning and as much reading as you can.
Valuable Resources
- Octane's GL1000 tutorial: The NGW Project Bike. Carburetor rebuild. If you can match half of his methods you'll do a blazingly great job on your carbs.
Randall Washington's Carb Tech Tips at the Randakk's Cycle Shakk website. At least read GL1100 Carb Details.
Randakk's Carb Synchronization Procedure.
The official Honda Service Manual. Get a printed manual, it's very convenient. If you want to download one, the Haynes Owners Workshop Manual pictured above is available. Read through pages 92 to 101.
Bench Sync for Carbs by Alley Kat.
Tools. Use drivers and wrenches that fit tightly and you'll ruin very few screws and bolts. Treat yourself to a new, quality #2 phillips with a good handle. You'll also need a #3 phillips screwdriver and likely a pair of vicegrips.
Chemicals, solvents and sprays. Brake cleaner, carb cleaner, WD-40, PB Blaster, anti-seize lube, strong bathroom cleaner, whatever it takes to get the carbs clean. Lots of clean shop rags, paper towels, toothbrush, etc. Some aluminum-loving Carb Cleaner (like Yamaha Carb Cleaner, it mixes 1 part to 2 parts water).
Use gloves when you're working with these chemicals. Many are quite caustic ... the brake and carb cleaning fluids will devour rubber parts and can easily eat your skin.
Tubs, containers and bins, Oh My! You'll need 10 or 12 of various sizes. Trash like Coffee cans, Orange juice and laundry detergent bottles. Plus small ones for the tiny parts.
The Jig is up. This simple jig will hold the carb rack without denting any important parts or flattening the floats. It works whether the rack is right-side-up or upside-down. That patent application better go through soon.
Compressed Air. Since this is Po'Boy talkin' here ... fancy air compressors are out of the question. So I butted this here up ag'in the wall and strapped it to the shelf.
Lean into it with the shoulder and both hands are free.
Let's Get Down to It!
Randakk GL1100 Master Carb Overhaul Kit contents.
- 1. O-rings for float bowl, carb to plenum, intake, idle mix (includes tiny washer), vacuum plug and float drain.
2. Air cutoff kit.
3. Accelerator pump kit (use extra o-ring in attached bag).
4. Carb to plenum fuel o-rings.
5. Fuel joint pipe o-rings; 4 large, 4 small. Plus 2 large for the fuel inlet barb on carb #3.
6. Brand new #3 phillips plenum screws.
7. Plenum o-ring.
8. Cotter keys for linkage.
9. Fuel petcock rebuild kit.
10. Fuel filter.
The Carbs have Left the Bike
Read the Carb Removal How-To to find out how that's done.
Clean up the outside with large doses of carb cleaner and brake parts cleaner.
That's better. Now you can see what you're doing.
Follow the directions in Howard's book to remove some of the linkage. You don't want to take it all off unless there's a problem that needs fixing.
To separate the plenum halves you'll need a good, tight-fitting #3 Phillips screwdriver. If you can't move a screw, try clamping vicegrips on the shaft. Push hard on the screwdriver and turn with the grips. Works every time. Discard the 5 screws. Watch for the little straw!
Separate the carbs and screens from the plenum halves. Keep each carb's parts separate from here on out. Discard all o-rings. I had a special trash bucket for discarded parts just in case ... didn't need anything but I saved it all.
Work the carbs one at a time. Disassemble it, wash it and then soak in carb cleaner for a few hours or overnight. I liked the result from Yamaha Carb cleaner, mixed 1 part with 2 parts water. While the first is in the carb cleaner, take the next apart and wash it. Keep the assembly line in order so you don't mix up the parts.
Remove the Vacuum Chamber, piston, sealing ring and airjet cover/piston guide (the black plastic part held in by a phillips screw, under the cover). Toss all removed parts into the soapy wash bucket.
NOTE: Pic is wrong, your carbs are separated now.
Flip the carb over and remove the 3 float bowl screws. I had a leak on the left, #2 & #4 side and the reason was obvious when I saw the smashed and cracking float bowl o-rings. But, I had done several soaks over the winter to try to clean the carbs so the bowls themselves were pretty clean.
Here's what you'll see under #3's float bowl.
Unscrew the Main Jet. Secure the Needle Jet Holder with a 7mm open end wrench if it wants to turn too. Remove the Needle Jet Holder. Turn the carb over and use a suitable soft punch (mine's a #2 Ticonderoga) to knock out the Needle Jet from the vacuum slide side.
Parts from the Main jet assembly.
To get out the Pilot screw's parts you'll need to make a small hook tool. Remove the screw and spring. There is a tiny washer and an o-ring down in there.
This is the pile of small parts you'll pull from the carb. Again, discard all of the o-rings. There is a replacement tiny washer for the Pilot and a Float valve washer so toss those too.
Now all of this goes into a soapy bath. Use a strong bathroom cleaner of some kind (my choice: BAM!!), put on your rubber gloves and scrub everything with a brush (not a wire brush!). Rinse and repeat until all greasy stuff is removed and you're getting happy.
Then everything goes into the carb dip for a nice, long soak. Follow the instructions on the bottle. Do not use the stuff from the auto store, get either Honda or Yamaha carb dip and follow those directions. I soaked each overnight but that may have been overkill. Count the little parts that you put in to soak.
Note: Put the next carb's parts into the soapy bath.
Next day ... remove big parts and then strain the little parts.
Count to make sure they're all present & accounted for.
There's those tiny buggers.
Note: Get another carb into the carb dip now.
Clean off the excess dip. Spray with carb cleaner or brake parts cleaner (or back to soap and water). Again, what do the directions on the carb dip say?
Look closely at all mating surfaces. Scrape (lightly) to remove gasket and o-ring gunk. Carbs are aluminum so be careful not to scratch the surfaces with your steel tools. Get the gunk out of all o-ring journals.
Repeat: Do not scratch the surfaces or you're looking at leaky carbs and will need to open them up again. Tough stuff will often come off with a concentrated spray from the brake parts cleaner. You can get big cans of this stuff from Wally-Mart for, like, a buck.
Now for all the holes and channels. Follow the red lines in these images as a general guide. Spray compressed air, parts cleaner, water-pic ... whatever it takes ... to clear out all of these. As Randakk says, "Everything Affects Everything," so make sure you clear all of these.
Plenum end.
Cutoff valve side.
Throttle side.
Vacuum chamber/top side.
Float bowl, jets, bottom.
Float bowl drain.
Vacuum Chamber. That little hole goes into the center where the slide fits. Clean it.
Cutoff valve cover has two channels to clean.
When you are more than satisfied with your cleanliness and starting to question whether anal-retentive is hyphenated or just two words ...
Take stock of the parts and arrange them for reassembly. Find all the necessary o-rings and new washers.
Do not mix up the float bowl screws, accelerator pump screws and air cutoff screws. They are the same size and thread but different lengths. Use a too-long screw and you'll be searching for a new carb body.
Assemble the Air Cutoff Valve. Line up the diaphragm; big end of spring goes down; small o-ring in place; top mates with knob in cover; tighten the screws.
Put the spring, tiny washer and o-ring onto the Pilot Screw. Turn the carb right-side up (vacuum chamber side up) and screw it in. Go in just until you feel it touch bottom, do NOT over-tighten. Then, back it off 1-1/4 turns ('80-'81), 3 turns for '82-'83.
Needle Jet goes in next, open end (looks like a tube) goes toward the vacuum chamber, convex end toward float bowl. Drop it in and line it up.
Tap lightly with a wooden drift/dowel to seat it.
Then the Needle Jet Holder. Double check the twelve little holes to make sure they are clean, clean, clean. Hold it up to a light and peer through to the other side to see.
And clean out the inside with a bit of light aluminum foil.
I just loves makin' tools.
Screw in and tighten the holder; then the Main Jet..
Put the washer and screen onto the float valve holder. Turn the carb right-side up, slide it in and tighten.
Ensure that the float valve/spring moves freely.
Make sure that the float pin moves freely in it's hinges. Clean the hinges with foil or a small file, it must move smoothly. Install the valve and slide in the pin.
Install the float Drain Screw with its new o-ring.
Attach the Float Bowl, do not install the o-ring/gasket and just finger tight on the screws. You'll need to set the floats after the carbs are assembled.
Onward and upward to the vacuum pistons. Clean and smooth is what you want here.
Use lightweight foil to buff the Piston body ...
... in here too ... NOTE: yep, plug should not be in yet.
... around the edge ...
... inside Carb Body ...
Note: another bad pic! Airjet Cover/Piston Guide and Sealing Ring should not be installed yet.
... inside the Vacuum Chamber ...
... and don't forget, down in here ...
Then clean, clean, clean all the newly buffed parts. Again with the brake/carb parts cleaner and compressed air.
Install the plug with its new o-ring into the slide.
Compare the length of the springs. They should be equal.
Put the four Vacuum assemblies together and place them upside-down on the bench. They should move freely and settle to darn near the same height.
Do NOT mix these up! They are paired with the carbs.
Screw down the Airjet Cover/Piston Guide. This screw is another close match to the cutoff and bowl ones. I didn't separate these from their plastic covers during the overhaul.
Press in the Sealing Ring, flat side to carb body.
Install springs, pistons and caps on #2 and #4. Leave them off of #1 and #3, those are installed after the carbs have been put back in the bike.
Specials for Carb #3
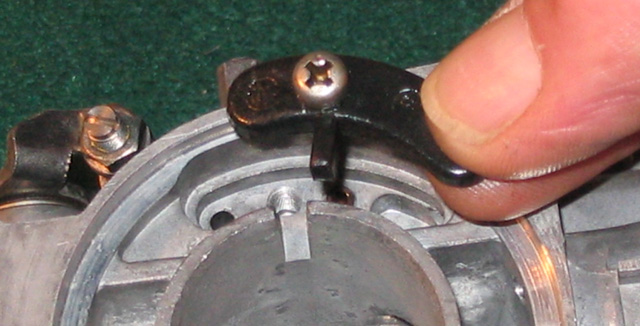
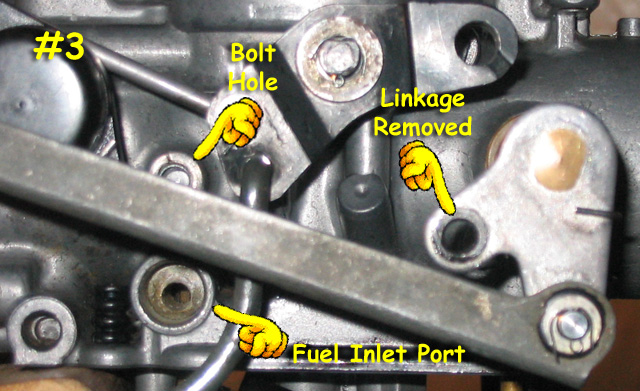
If you haven't already, remove the Fuel Inlet Port, clean it all up and replace the two o-rings. You may have to remove the linkage that's blocking access.
There's a lock washer behind the hold-down bracket.
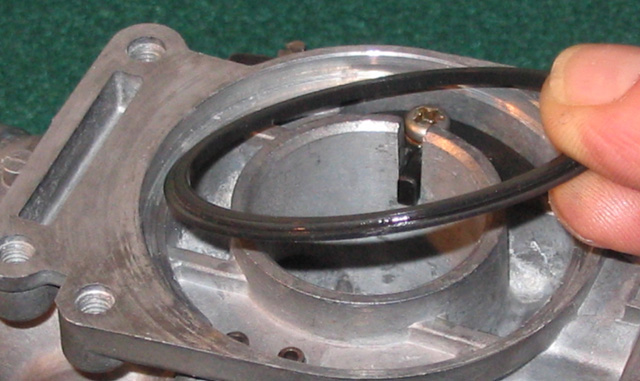
This is not in the book. Randakk pointed me to the correct section on his Tech Tips page and I had to do this after the carbs were all attached to the plenums. Not fun that way.
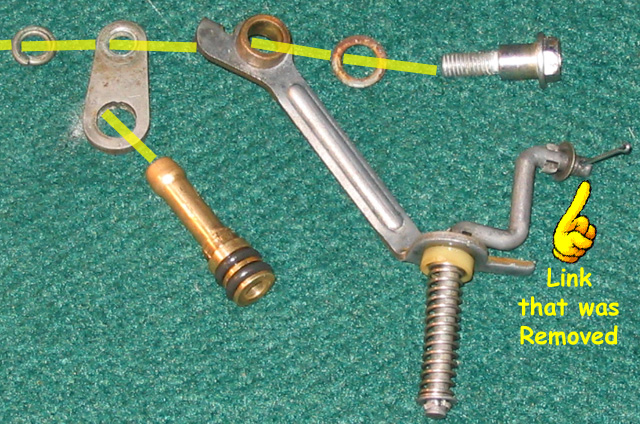
It goes back together as shown here.
Accelerator assembly: clear all of the holes in the carb.
Clean out the holes in the cap, much like those in the Air Cutoff covers.
Install the diaphragm, spring and cover. Don't forget the little o-ring (in separate, attached baggie, toss other one) or she'll leak. Put a little grease on the shaft and slide the gaiter onto the shaft.
Special for Carb #4
Sorry, no image of this ... Attach the choke lever with the new cotter key.
Final Assembly
Collect carbs #2 and #4, fuel tubes, springs and o-rings.
Put the o-rings on the tubes and slide one end of each into one of the carb bodies. Note: Float bowls should be on.
Loosen the sync lock nut and screw all the way. Slip the accelerator linkage together, between the two washers. Make abso-F'in-lutely sure that there is a washer above the linkage and one below.
Slide in the spring. Take a close look.
Spring in position. Are you certain that the linkage is fitted BETWEEN the two washers?
Push the carbs together being careful not to bend the tubes.
Repeat that for carbs #1 and #3.
Refer to Howard's book for this next step. It's important that the Li'l o-ring and Bigger o-ring are placed in the correct holes or again ... leakage.
Install the large carb to plenum o-rings.
Sorry, no image for #2 and #4. The two small o-rings go one on each carb, same side and close to each other. Next time I rebuild a set of 1100 carbs (wayyyy in the future) I'll add a pic, promise.
Remember that straw? It's time to put it in its hole.
Put the beautiful new plenum gasket in its journal and mate the plenum halves.
Oh, boy! New plenum screws!
Don't forget to include the Choke Bracket under the one by carb #3 before you tighten it down. Don't ask.
Assemble the linkage with the new cotter keys. If you replace all of the keys you should end up with one leftover.
Moving right along and getting close to done.
Time to set those float levels. Remove the float bowls. Stand the carbs up with the intakes secured. Rubber furniture coasters work good ... just don't let the assembly slip and crash to the floor (no I di'nt).
The angle you want is where the floats have just settled on the valves but are not compressing the springs inside.
Measure from the bottom of the float to the gasket surface. It needs to be 15.5 mm along the entire length. Mine were correct near the valve but about 12 at the lower (as in pic) end. Bend the tang to adjust. See the blowup inside the pic below? That is the tang. It's in the center of the hinge and bends without a whole lot of force.
Do avoid bending where the floats are attached or anywhere else.
You may proceed when the floats are perfect.
Put the new o-rings on the Float Bowls, tighten the screws.
Now for Alley Kat's Bench Sync.
Get a nice smooth piece of wire or a long pin to use as a feeler gauge. Adjust #3 carb with the throttle stop screw so that the wire slides through the top and/or bottom with a little resistance. You'll need to prop the idle adjusting screw out for this (see the paint brush handle?).
Adjust carb #1 to match, checking top and bottom.
Rotate to the other side and adjust #4 carb with the sync screw on the right.
Adjust #2 to match.
Repeat from the start and double check. This will be a pretty good starting point for your future running sync.
Use a syringe to fill the carbs with gas through the fuel inlet fitting. Test it by rotating the throttle and watching for gas spritzing into the carbs. Check that all of the choke and throttle linkage works smoothly.
Ready to go back on the bike.
Now, the famous line, "Reassemble in the reverse order" in the Carb Removal, GL1100 procedure. Also, Howard's book has some excellent advice on the installation procedure.
Here's a new (26 Sept. '09) tip on tightening the clamps on the rubber intake runners. When everything is buttoned up and you've got the bike running and well warmed up, re-tighten the ring clamps. With the rubber warm you should be able to get almost an extra turn on the screws. This will reduce air leaks at that connection.
Synchronicity
Everything worked out good for me with all of the bench syncing and such. She started right up on the first crank and ran like a dream (sort of). Check out my Video in the Dark below to see the first minutes of the startup.
[flv]https://classicgoldwings.com/forum/vids/Winnie's%20New%20Carbs.flv[/flv]
After that, the fine-tuning was somewhat of a circus.
There's a special tool required to adjust the Pilot/Idle Mixture screws called a Pilot Screw Adjuster (imagine that?!). Motion Pro has them, starting at $29.99 and going way up from there. I rode down to the Honda dealer and pal'ed up with a mechanic who let me borrow his brand-spankin'-new, never been used, $125 tool.
[EDIT=17 Oct. '09] I finally ordered the tool from Motorcycle Superstore.
Link to it in their online catalog.
To adjust the screws, you must first get a black marker and score through the Idle Drop procedure outlined by Honda in their manual. To meet emission standards, Honda developed the idle drop method and it ensures that your bike will run lean at idle. Not good.
Puffy75 advises us to do it differently. This will get you a better idle and quicker warm ups.
First, attach an accurate, external tachometer. Warm up the bike and set the idle to 950. Pick an idle mixture screw and turn it in/out to achieve the highest RPM. Leave it there. Reset to 950 RPM. Do another screw. Repeat until all 4 have been set.
Then do a sync and you can come back and adjust the pilot screws again if you like. [/EDIT=17 Oct. '09]
As for vacuum sync ... well ... I spent quite a bit of time making a homemade manometer. Only spent about $10 but it just didn't work for me. I think my tubing was too small. When I started the bike, all of the Marvel Mystery Oil got drawn out of the tubes and into the intakes. That sucks. I ended up getting in touch with Ritalz through the NGW Club who let me come over and use his set of mercury sticks. Definitely the way to go. For more info on how to sync 'em, do Randakk's Carb Synchronization Procedure. After my sync, she runs much better ... check out the video below taken a few days later. Those Harley mufflers really changed this old gal's personality.
[flv]https://classicgoldwings.com/forum/vids/Winnie's%20Runnin'.flv[/flv]
There you go. All done!
Now, get out there and RIDE!
Click Here to get the printer friendly PDF of Carb Overhaul, GL1100.
Foxit PDF Reader FREE, small, quick: replaces Adobe Reader (2.6 MB, Windows only)
Roady, 30 June 2008
With help from: