its been snowing on and off all day so the wing has been parked even though the dunlop e3's on the wing have more tread than the dunlops on the van 
You are using an out of date browser. It may not display this or other websites correctly.
You should upgrade or use an alternative browser.
You should upgrade or use an alternative browser.
What did you do to your Wing today ?
- Thread starter Winger 82
- Start date

Help Support Classic Goldwings:
This site may earn a commission from merchant affiliate
links, including eBay, Amazon, and others.
A
Anonymous
Guest
detdrbuzzard":12lxut0q said:its been snowing on and off all day so the wing has been parked even though the dunlop e3's on the wing have more tread than the dunlops on the van
SNOWING??
- Joined
- Dec 3, 2009
- Messages
- 9,282
- Reaction score
- 327
- Location
- Duncanville, Texas
- My Bike Models
- 1981 GL1100 Innerstate("The Turd")SOLD!!, 1996 GL1500 Innerstate
Pulled the speedo off(again :rant: ) to lube the bushing. The speedo stopped working, and was making a REALLY nasty noise. Well...lubing fixed the noise, but the speedo is toast. Gotta find another one.... :head bang:
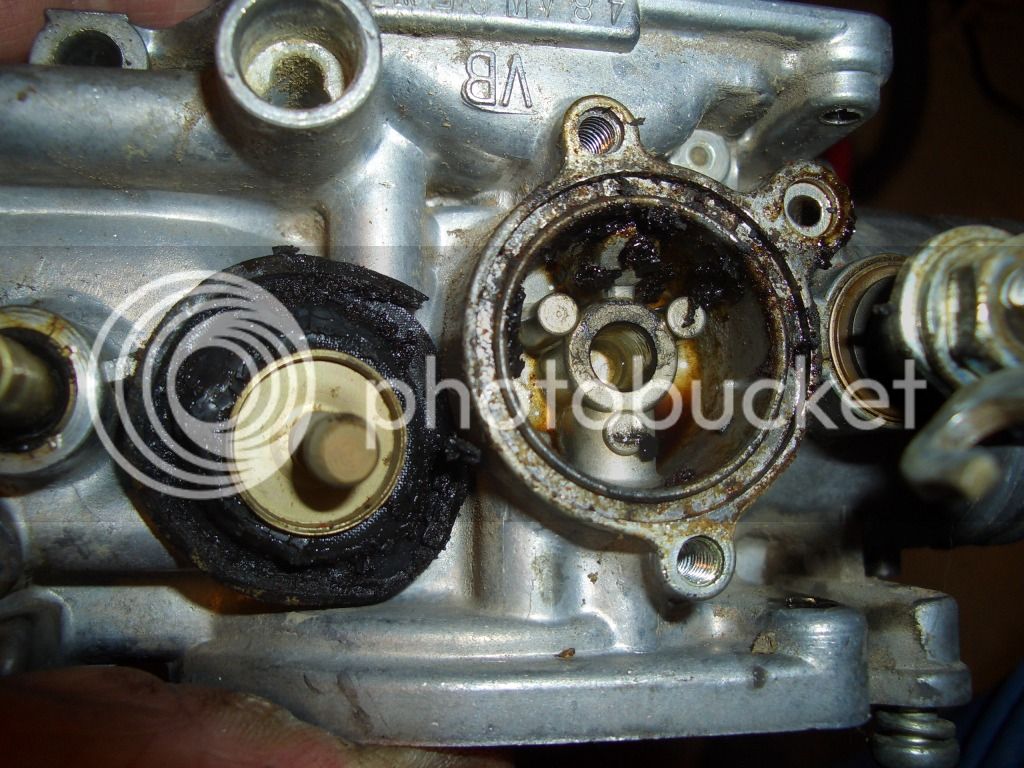
Filleted a couple of my carburetors and began the cleaning process. This is why you can't just shoot a bunch of carb cleaner into and on a set of carbs and expect them to be clean. I knew I would find a condition like this because when testing the bike just after purchase it would back fire when decelerating from a high RPM. This is the air cut of diaphragm in the first carb taken apart. The chemicals used by a PO (there's that guy again) have eaten away the vulcanized rubber from the part. This section is connected to the low jet circuit and in addition to the tell tale back fire the engine was a slug. This is because that circuit supplies all the fuel at idle and continues to supply fuel throughout the entire throttle range. Although I use an ultrasonic cleaner which does an excellent job I now have concerns about the condition of the low jet which is pressed in. So, I removed it with a screw extractor. It is a # 35 jet and the emulsion holes are .026 in diameter and takes a #71 drill bit. What I haven't discovered yet is the actual original size of the jet itself. I'm thinking from what I can tell it is a .0145 and the smallest bit I have right now is a .018 which is too big. I have cleaned the jet several times and now can see a perfectly symmetrical hole. although I'm satisfied the jet will be as good as new I'm still not satisfied that all the oxidation is cleaned off the lip of the orifice. I like to know the perfect size and run a bit through just to KNOW it as new. Off to get some jewelers bits tomorrow as I have three mor of these things to pull and clean.


no snow stuck to the ground or grass and the temp was in the low 40's but the air was cold enough that we got snow, was comming down hard at times1060dsl":fok3zgfm said:detdrbuzzard":fok3zgfm said:its been snowing on and off all day so the wing has been parked even though the dunlop e3's on the wing have more tread than the dunlops on the van
SNOWING??
silverbullet
Well-known member
155 Smiles today! :yahoo:

$80.95
$89.95
Mens Armored Checkered Flannel Biker Shirt, Multiple Waterproof Storage Pockets CE Approved Armor Reinforced Water Resistant (Grey, L)
Vance Leather Inc

$39.95
$59.95
Honda GL1800 Gold Wing 1800 (01-10) Haynes Repair Manual (Paperback)
Haynes Repair Manuals

$31.29
$33.45
Show Chrome Accessories 52-647 Chrome Instrument Accent for Honda Goldwing
Niehaus Cycle Sales, Inc.

$44.99
Harley-Davidson Rust Orange #1 Logo Sports Duffel Bag w/Shoulder Strap - Black
House of Harley-Davidson Online

$39.95
$49.95
Honda GL1500 Gold Wing Motorcycle (1993-2000) Service Repair Manual
Haynes Repair Manuals

$100.00
$169.99
1988 Honda Gold Wing GOLDWING GL1500 Service Shop Repair Manual OEM FACTORY 88
GLAVIS ENTERPRISES

$38.97
$54.95
Clymer Honda GL1200, 1984-1987: Maintenance, Troubleshooting, Repair (Clymer Motorcycle)
Empty Estates

$18.99
2001 2002 2003 2004 2005 Honda GoldWing GL1800/A Service Shop Repair Manual OEM
DD_Liquidators

$89.95
Harley-Davidson Trailblazer Hop Along Travel Duffel Bag - Black/Rust Vintage X-Large
Wisconsin Harley-Davidson

$69.00
$95.00
1986 Honda Goldwing GL1200 Electrical Troubleshooting Manual EWD EVTM OEM 1986 x
yourshopmanual

$57.18
$69.95
Show Chrome 52-642 Chrome Motorcycle Lower Air Vent For Honda Goldwing 2001-10
Amazon.com

$150.00
1984 Honda Gold Wing GL1200 Factory Service Manual Dealer GoldWing Shop Repair Workshop
GLAVIS ENTERPRISES

$65.95
Harley-Davidson Rugged Twill 21" Convertible Duffel Bag/Backpack - Heather Gray
Wisconsin Harley-Davidson

$36.74
$45.95
Triumph Bonneville T100, T120, Bobber, Thruxton, Street Twin, Cup & Scrambler (2016 - 2017) Haynes Repair Manual (Haynes Powersport)
Goodwill of Silicon Valley

$44.95
Harley-Davidson Bar & Shield Logo Zipper Rugged Graphic Duffel Bag - Black
Wisconsin Harley-Davidson
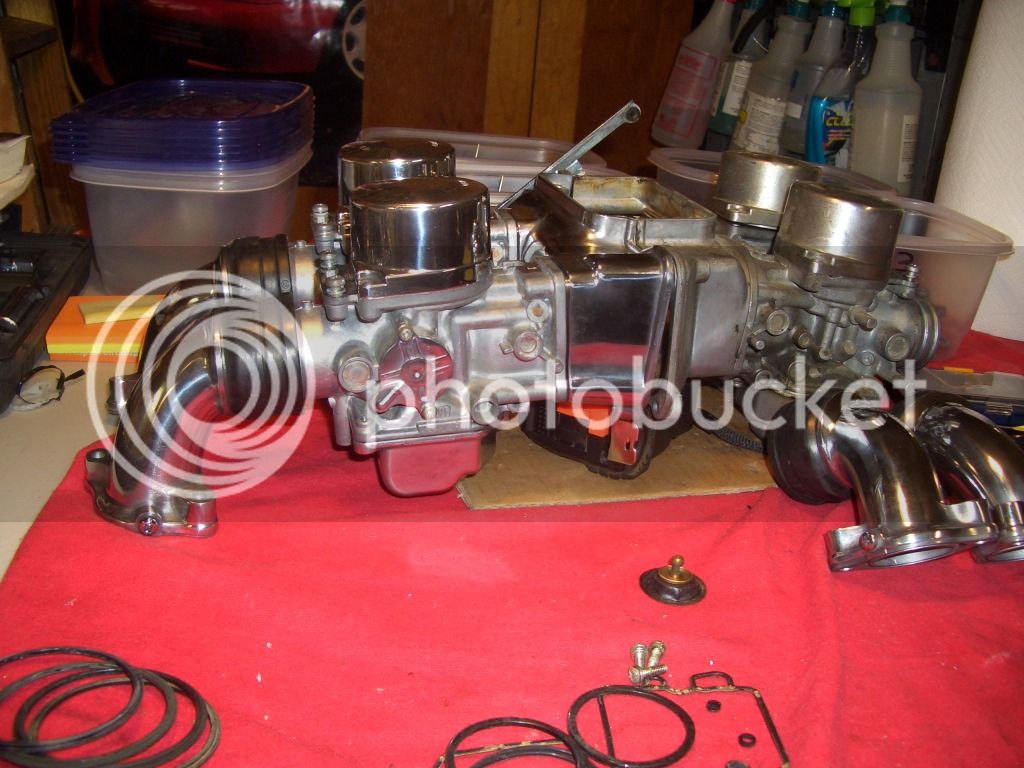
Polished some more. Halfway done with the polishing.


gee weez thats nice
joedrum":wcsluqpe said:gee weez thats nice
Thanks Joe, compliments from a man of your stature are important. :thanks: :thank_you: :thank_you:
Winger 82
Well-known member
Sidewinder":2d17pt79 said:Polished some more. Halfway done with the polishing.

Ya shur got a purrty carb :smilie_happy: :smilie_happy: :smilie_happy:
[email protected]
Member
That carb looks awsome. I am doing a restoration, and I would love to know how you polished those parts. :clapping:
[email protected]":3pibm5x7 said:That carb looks awsome. I am doing a restoration, and I would love to know how you polished those parts. :clapping:
The shiny parts were oxidized pretty bad and scratched up so, I started with 220 grit sandpaper, then 320 grit, followed by 800 grit .......... Then to the polishing wheels ..... first run with brown or tripoli compound to a decent shine, then the green compound. Took about 3-4 hours total and lots 'O rubbing.
The bodies were in the ultrasonic cleaner for extended rides on and off over a couple of days.
All the brass parts including jets were cleaned along with the bodies, holes cleared with proper size micro drill bits then finished off with 0000 steel wool to a shine.
nothing yet, i'm still at work
[email protected]
Member
The motor, she is out last night. Then I will strip the rest of the frame, and begin sanding and painting, and tinkering with the motor
[email protected]
Member
Way short on tools, no ultrasonic cleaner, or polishing stuff. But your carbs still look awesome.
i dropped the 1500 wing off at my friends so he can change timing belts for me
A
Anonymous
Guest
Sidewinder":2k25hfbc said:[email protected]":2k25hfbc said:That carb looks awsome. I am doing a restoration, and I would love to know how you polished those parts. :clapping:
The shiny parts were oxidized pretty bad and scratched up so, I started with 220 grit sandpaper, then 320 grit, followed by 800 grit .......... Then to the polishing wheels ..... first run with brown or tripoli compound to a decent shine, then the green compound. Took about 3-4 hours total and lots 'O rubbing.
The bodies were in the ultrasonic cleaner for extended rides on and off over a couple of days.
All the brass parts including jets were cleaned along with the bodies, holes cleared with proper size micro drill bits then finished off with 0000 steel wool to a shine.
I would be too embarrased to put a picture of my carbs next to these! they Look Great !
patcoburn
Well-known member
My sync gauges came in today. So tomorrow I'll try to sync the carbs and see if that solves the miss problem. I have my fingers crossed.
:lazy:
:lazy:
[email protected]":2yp6r8dm said:Way short on tools, no ultrasonic cleaner, or polishing stuff. But your carbs still look awesome.
Harbor Freight sell a good little unit fairly cheap especially if you take a 20% off coupon in with you.
https://www.harborfreight.com/25-li...-782A-E011-B31E-001B2163195C&mr:referralID=NA
Also you can acheive the same results with a hand drill and cheap 3" wheels. Actually HF sells a beginners polishing kit too. In fact, I may just go down and pick up one of these. Can always use the mushroom and little wheels. It looks like that's enough polishing compound to do one bike and have some left over to boot. That white compound is great for doing plastics like tail lights and signal lights, makes 'em look like new. I mean, if you and taking it apart may as well put it back like new eh.
https://www.harborfreight.com/14-piece-aluminum-polishing-kit-98707.html
Raider11
Member
Just looked at her today, weather was supposed to be horrible, it wasn't to bad but now driving four wheels to work sucks. Of course in Vegas we only have 3 days a year like this.
My baby needs a bath, sitting next to the 750 which looks like a diamond (shined up like Sidewinders) it looks horrible. So a deeeeeep cleaning on order. Good news is all that polishing equipment is sitting out there. (Harbor Freight baby)
I need to go through the bike top to bottom, inspect everything. So far a new seal for the shifter is required. Minor cosmetic repairs and a lot of "soul cleansing" needed.
Now... Back to studying the bike.


