1982 Motor Removal and Stator Change

Classic Goldwings

Help Support Classic Goldwings:

This site may earn a commission from merchant affiliate links, including eBay, Amazon, and others.
Quick question. Has anyone used a product called Engine Ice to replace their coolant instead of anti-freeze? This question may need to go to the tech section.
 
Used to watch the Twenty Minute Workout back in the early '80s I think first thing in the morning to get the blood flowing and eyes open. Men haven't changed much, just learned to adapt to stay out of trouble. We're still only three feet from the cave. What's that saying - born in the mountains, raised in a cave.

Like the Morning Joe show, more down to earth and lots less drama than on the US news feeds. Trump has done our politicians a favour, we pay more attention to what is happening south of the border than up here. Takes the heat off our Little Lord Fauntleroy.

Back to the thread issue. These starter clutch parts are small and may not need to be replaced. Wouldn't hurt to go in and do a good cleaning of this part/pieces. A symptom of the starter clutch being gummed up is when the starter spins but the engine doesn't. Lots of threads on this on the various forums. To clean it properly you would have to remove the rotor and get to the clutch part. Like your oil screen, good preventative maintenance.

Cheers
 
I read that and I did clean it. That rotor is heavy. I feel better about now, but it all looked pretty good. Forgot the pictures. Camera was down. I stretch every morning, otherwise I would probably be in bed all the time.
 
Camera is back up. I need a new battery for it since I can get about 20 shots and have to recharge it.

First thing I did was clean off all the old gasket material. The gasket on it was in great shape but since I have a new one coming I took it off. Most of it just pulled off but I used a flat razor blade for the rest. I've used a Scotch-Brite pad in the past and there is some kind of gasket remover but I've never used it. Got to be careful though with the blade.

IMG_0685.jpg


Don't go nuts and start scraping off the gasket that is over the clutch basket unless, of course, you have another.

The three bolts holding the stator on the rear housing have to be removed and there is another snap ring on the other side holding in the wiring that goes to the rest of the bike. So then it is my favorite thing, using the circlip tool. This time I did not have to loose my religion and I did not break it.

IMG_0686.jpg


Simple matter then of tapping out the stator and it is best done from behind. Don't be prying it out, you run the risk of breaking off pieces of aluminum. I happen to have the remains of a couple of other 1100 motors so I was not real concerned about that. The whole thing comes out pretty easily.

IMG_0687.jpg


Clean things up where the old one was. Then put in the new one aligning the wiring and the three bolts that go back in. I searched for the torque spec in my manual and couldn't find it. I did not go ham-fisted with these bolts. They are tight and I put some anti-seize stuff on them. Looks good.

IMG_0688.jpg


All of this damn work just to put that thing in. Well, it's in so I had to pull the wiring tight and put the snap ring back in on the other side. It went in but not without a fight. It's hard to press against the back of the wiring and hold the tool at the same time.

IMG_0689.jpg


Going to blow everything out with the compressor and wait for the gasket to come. Next up, the compelling installation of a rectumfier. You won't want to miss it.
 
There are mechanical procedures that the novice should never try, but I will walk you through this one. Removing a regulator/rectumfier. There is skill and patience required. First you will need to find the offending, dead, POS part. On an 82 GL1100 it is under the false tank, attached to the left top frame. You need a socket wrench with a 10mm socket. (Or a big pair of pliers) OK so far? Now please pay close attention to the picture below and see yourself putting the socket on the bolt and turning it lefty loosy. Repeat the procedure on the other bolt.

You got this and WILL receive a participation trophy.

IMG_0690.jpg


I was successful and here the old, rotten, part lies dead on the top of the bike.

IMG_0693.jpg


This is a hard part, but you see that electrical connection? The technical name for it is electrical connection. You need to separate the connection. Use your God given strength and push the little electrical connection tab with a good strong finger and pull the two pieces apart. Then discard the old rectumfier.

Here you see my brand new part installed in just the exact opposite way the old one came off. I apologize for not making a video of the procedure. We could probably facetime if you need help.

IMG_0694.jpg


I'm going to end this post because I know that things got technical and you have much to absorb before attempting this yourself.
 
My gasket came in from Saber Cycle. Not going to bring up old stuff about them right now because I have had two good orders in a row and don't want to be banned for life again.

Here it is on the back of the motor. There is a dowel on the top and two long bolts on the side to keep it in place while you fit on the rear cover.

IMG_0695.jpg


Putting on the rear cover would be straight forward except the inside of the drive shaft has to go inside a gear thing. And to get to that gear thing you have to remove four small bolts on the right side of the engine and remove an inspection plate. You see the opening here. And the gear thing that needs to be aligned with the shaft as you push it in.

IMG_0696.jpg


Once you have that all seated you can attach the hundreds of bolts that go around the housing. (You weren't a dumbass and not bag the bolts right?) Don't go he-man here. These torque to 9 ft lbs and you whistle with more pressure. They are all 8mm.

Once all are tight, and I go around the thing twice, go ahead and put on your clutch cover with the 100 mm bolts. (Just seeing if you were paying attention) 10mm. Same thing with the torque values. Here is how it looks.

IMG_0697.jpg


Next up is reinstalling the Pulse Generator. Goes in the way it came out with four small bolts to hold the pick ups in and the cover has three. The only deviation is that there is a small dowel that goes into the upper right for some reason. If you didn't pull it out when you took off the PG it should still be there. Don't forget this.

IMG_0698.jpg


After I did all of this I gave the motor another bath with Purple Power and Dawn and water. Wiped everything down again to get ready for paint. I have one shot after a quick first coat. I will be giving it at least thee. Ta Da

IMG_0699.jpg


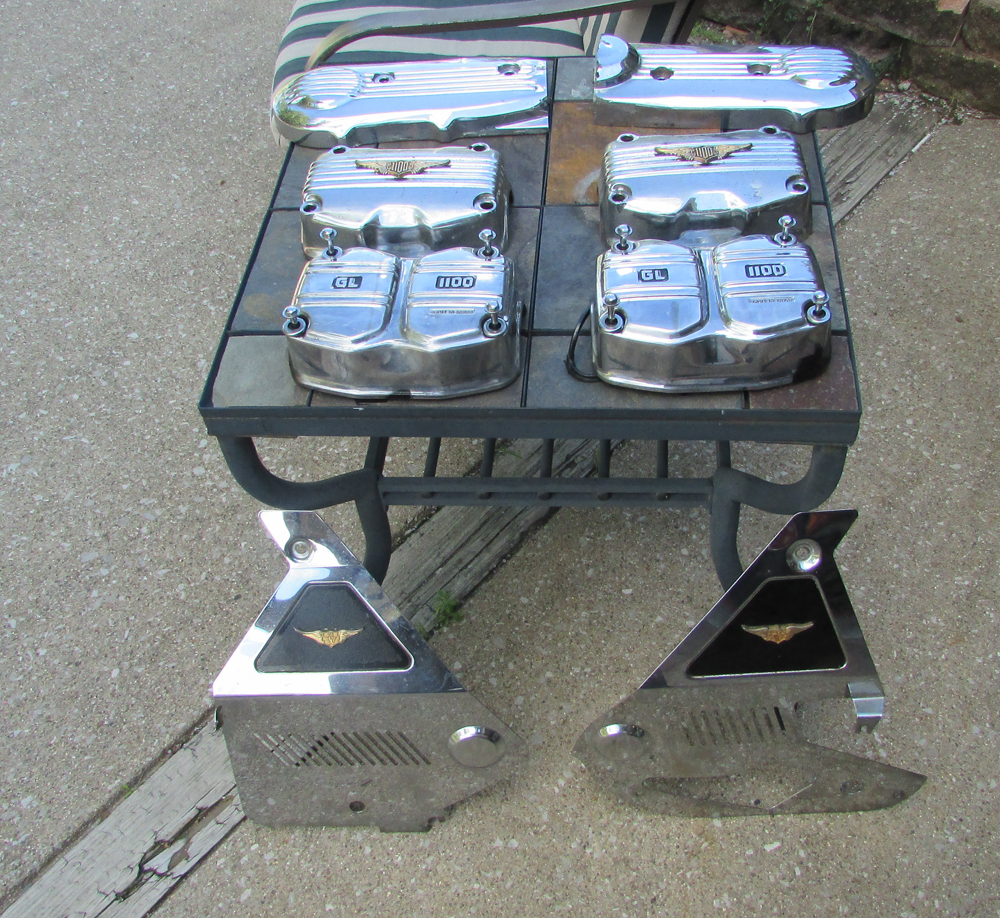
I have decisions to make on a couple of things. I painted the timing belt covers black since they were black before. I do have a set of chrome ones though. The chrome is not showroom, but they are 5 footers. Also have another set of valve covers that are probably better chrome wise but I'm pretty sure I will need new gaskets if I use them. Could do it later too.

Will post a final pic after supper.
 
Yes you did and thanks for the reply. I am going to flush my cooling system when things are back together and I saw something on the Engine Ice. Cheaper to use regular anti-freeze and it's worked fine forever.

I had to look up Elwood and it is really close to an uncle I have on the west side of Anderson I was through there not long ago. Busy area. But, like the rest of Indiana, beautiful.

BTW, I just saw a commercial I don't understand. Why would I want to change my cell service because some girl crashes through my wall, lands on the floor and wants me to take a selfie with her convincing me to change? Am I dense?
 
Hopefully today I can get some help getting the motor on my lift and get it back in the bike. Number one son is in French Lick, Indiana at some kind of conference so he is no help. Gotta find a buddy.

In the meantime I have to decide on the timing belt covers. They were black before and I painted them again. I liked the look. See what you think.

IMG_0701.jpg


But I have a set from another bike that are chrome. The chrome is better than I remember and I have no problem using them. What say you? Honest opinion, not just say "use whatever you want".

IMG_0702.jpg


IMG_0703.jpg


Kinda wish I had a set of valve covers that aren't chrome so I could paint them black. I think that that would be cool. Gonna check my stash.

I started to look at the float levels in the carbs but I can't find my metric ruler. You would be surprised to know how hard it is to find one. Going off to town to find one in a while. I imagine that they are off because I am getting gas in the cylinders and that is a recipe for disaster.
 
Low and behold I found a set of valve covers that are not chrome. They have been painted. So I am going all black.

IMG_0704.jpg


I used my grinder with a scotch brite like thing to remove about 99% of the paint. Then I shot a poor picture of some paint stripper to get the rest of the paint off. Scrubbed with a wire brush.

IMG_0705.jpg


IMG_0706.jpg


You will have to trust me that the goo you see is paint stripper. This last shot is after I cleaned the rest of the paint off the covers and cleaned them with mineral spirits.

IMG_0707.jpg


Crappy shot. I think my camera needs laser surgery to correct that vision problem. It is hard to see in my pictures but the emblems are not of the same color. One is faded. Now, I could just leave them alone, I could try to use a tiny paint brush and touch them up. Or, I could just paint them both black. I would imagine that I would still be able to see the eagle and the 1100 imprinted in them but I'm not sure. Whatever, I think these will look badass black with the motor. I'm excited and I just peed my pants.

TMI

While I ponder that I need to go find a metric ruler, some good primer and some better gloves.
 
Turns out that I have some extra stuff. The chrome on these pieces are about an 8 out of 10 and I'm going to sell them. So if you are in need and have yucky ones now, let me know. How about $20 a set?

IMG_0709.jpg


I'll take better pictures if you are interested. Eventually I'll put something in the for sale thread.
 
[url=https://classicgoldwings.com/forum/viewtopic.php?p=203997#p203997:zdleojn7 said:
wedoo2 » Yesterday, 10:25 am[/url]":zdleojn7]
Low and behold I found a set of valve covers that are not chrome. They have been painted. So I am going all black.

... I'm excited and I just peed my pants.

TMI

While I ponder that I need to go find a metric ruler, some good primer and some better gloves.
...and maybe a change of pants! :smilie_happy:
 
Finished the engine painting and I'm pretty happy with it. The chrome tips on the valve covers are a nice contrast to the all black motor. Still need to find one more bolt for the timiing belt cover. Got one around here someplace.

IMG_0710.jpg


IMG_0712.jpg


Next up is giving he carburetors a good cleaning since they are off the bike. Set the floats to be sure of that. And I think I'l buff on the float bowls and caps. Shine them up a bit.

IMG_0713.jpg


See my new ruler?
 
About those inside timing cover bolts. I choose not to run with them. Makes pulling the covers a breeze without removing the radiator. The two outside bolts hold them on just fine. Of course, I am in Arizona and moisture intrusion is not a concern. (Although some folks run with no covers at all...)
 

Latest posts

Top