Maybe it's a blessing that you found this while it's apart and easier to fix!
You are using an out of date browser. It may not display this or other websites correctly.
You should upgrade or use an alternative browser.
You should upgrade or use an alternative browser.
Damaged Center Stand
- Thread starter mcgovern61
- Start date


Help Support Classic Goldwings:
This site may earn a commission from merchant affiliate
links, including eBay, Amazon, and others.
OP
OP
- Joined
- Dec 3, 2009
- Messages
- 11,031
- Reaction score
- 299
- Location
- Kingsport, Tennessee
- My Bike Models
- Former '82 GL1100 "The Slug"
Yep, I'm glad I found it before the engine went back in, but I still have to transport the rolling frame to his house where the welder is setup.
- Joined
- Dec 3, 2009
- Messages
- 9,284
- Reaction score
- 330
- Location
- Duncanville, Texas
- My Bike Models
- 1981 GL1100 Innerstate("The Turd")SOLD!!, 1996 GL1500 Innerstate

OP
OP
- Joined
- Dec 3, 2009
- Messages
- 11,031
- Reaction score
- 299
- Location
- Kingsport, Tennessee
- My Bike Models
- Former '82 GL1100 "The Slug"
Finally got a chance to take some pics of the hole. Here is the area before the cross bar is replaced:
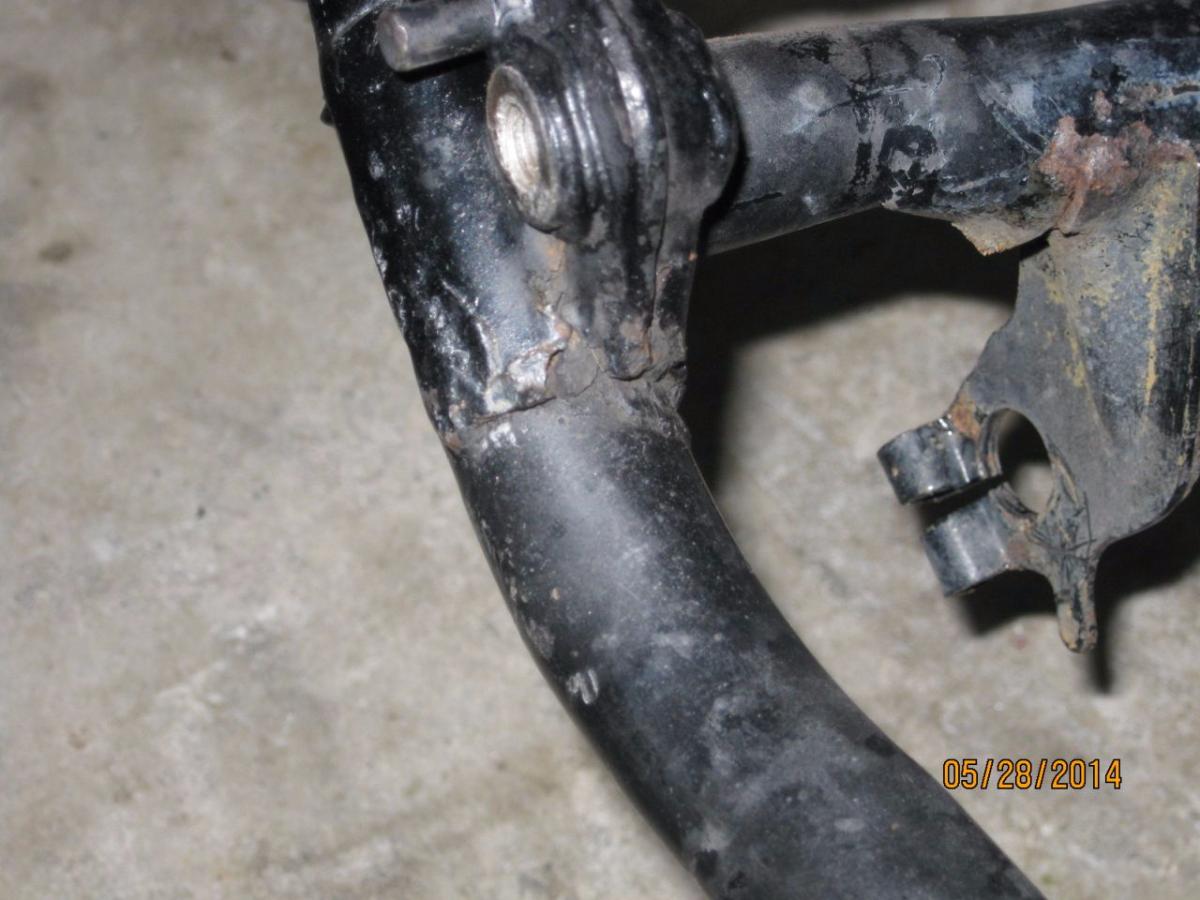
As I think you can see, upon first look it sure seemed OK except for the obvious rust on the cross over tube and centerstand.
Here is after I found the hole:
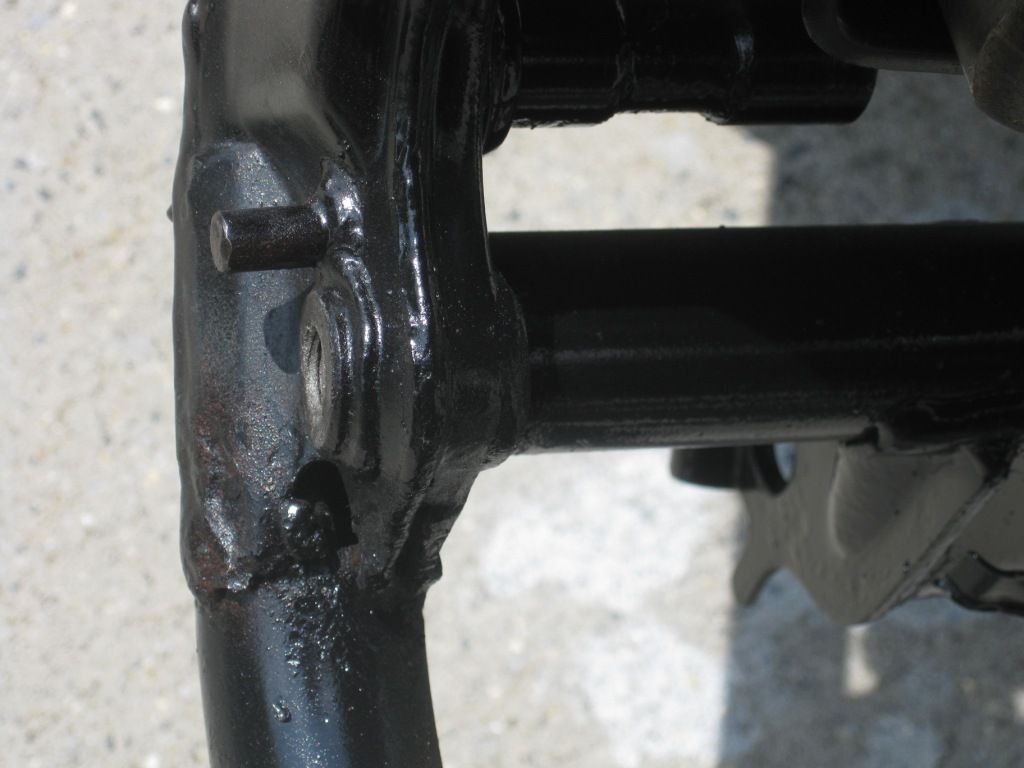
I cannot do anything about it at the moment time wise, but I am open to opinions on the best way to repair this.
As I think you can see, upon first look it sure seemed OK except for the obvious rust on the cross over tube and centerstand.
Here is after I found the hole:
I cannot do anything about it at the moment time wise, but I am open to opinions on the best way to repair this.
OP
OP
- Joined
- Dec 3, 2009
- Messages
- 11,031
- Reaction score
- 299
- Location
- Kingsport, Tennessee
- My Bike Models
- Former '82 GL1100 "The Slug"
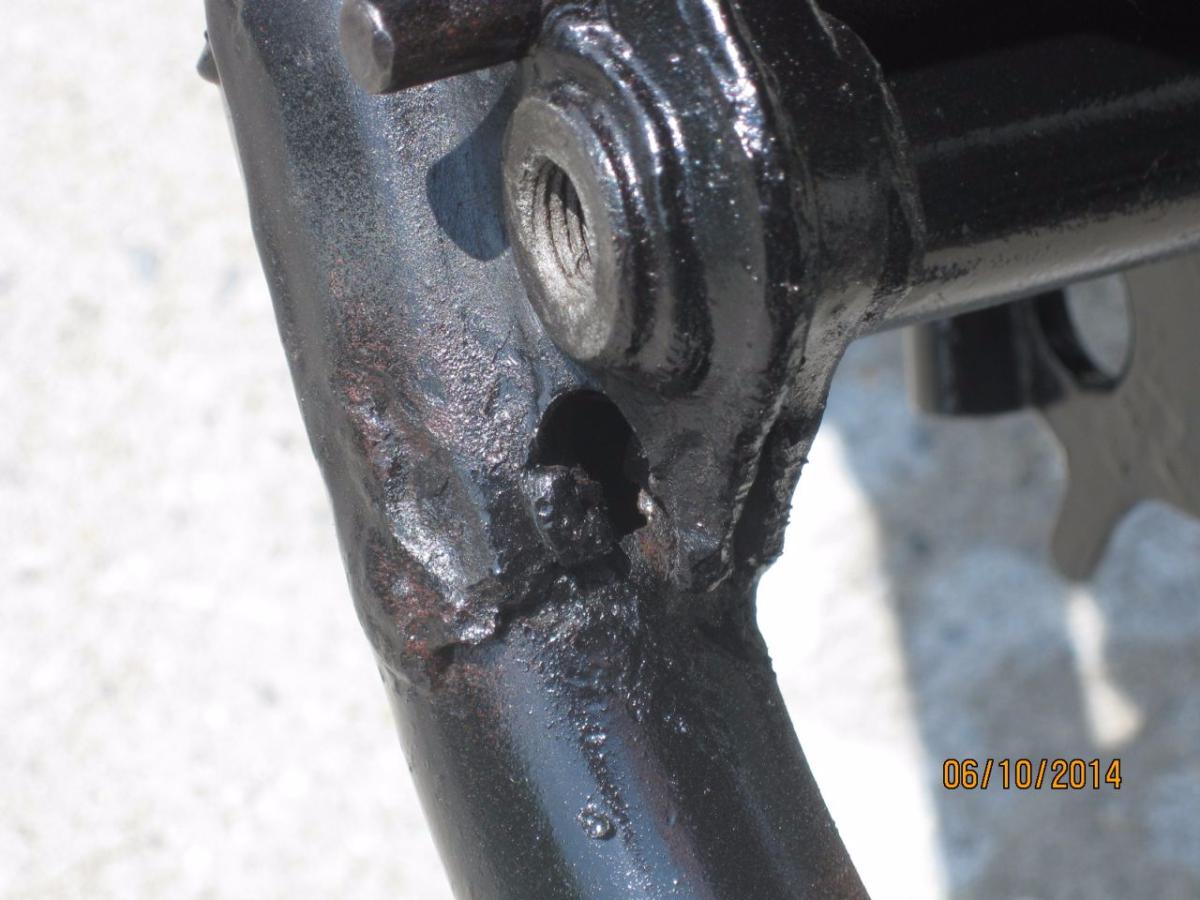
What I find odd is the rust hole is at the top of the tube. The bottom of the tube is intact and holding up to hammering.
I was thinking of using a cutoff saw to cut back the bracket of the foot peg and bad tubing and trying to fit a new section of pipe (1/2 round) under the foot peg mount.
I was thinking of using a cutoff saw to cut back the bracket of the foot peg and bad tubing and trying to fit a new section of pipe (1/2 round) under the foot peg mount.
Are your concerns the internal hole, the external hole, or both?
Weld that sucker up and call it good! It you really want to take it further, add a gusset but I think that would be over-kill.
Weld that sucker up and call it good! It you really want to take it further, add a gusset but I think that would be over-kill.

$39.95
$49.95
Honda GL1500 Gold Wing Motorcycle (1993-2000) Service Repair Manual
Haynes Repair Manuals

$39.95
$59.95
Honda GL1800 Gold Wing 1800 (01-10) Haynes Repair Manual (Paperback)
Haynes Repair Manuals


$99.00
$129.00
Sena Universal Helmet Clamp Kit for CB/Audio of Honda Goldwing (20S, 20S EVO, 30K)
ProRidersClub


$38.79
$45.95
Triumph Bonneville T100, T120, Bobber, Thruxton, Street Twin, Cup & Scrambler (2016 - 2017) Haynes Repair Manual (Haynes Powersport)
GoodwillBooks


$10.20
$11.99
ZALALAS Travel Duffle Bag,96L Extra Large Duffel Bag Lightweight,Waterproof Duffel Bag for Men Women,Black
Amazon.com


$48.99
COMPLETE HONDA GL1800 GOLD WING MOTORCYCLE REPAIR SHOP & SERVICE MANUAL For Years 2001, 2002, 2003, 2004, 2005, 2006, 2007, 2008, 2009 & 2010
Classic Automotive Repair Shop & Restoration Manuals


$44.95
Harley-Davidson Bar & Shield Logo Zipper Rugged Graphic Duffel Bag - Black
Wisconsin Harley-Davidson


$49.00
WILD HEART Waterproof Motorcycle Duffel Bag PVC500D With Rope Straps and Inner Pocket 40L 66L 100L for Kayaking, Camping, Boating,Motorcycle
ZHONGSHAN WILD FRUIT OUTDOOR


$150.00
1984 Honda Gold Wing GL1200 Factory Service Manual Dealer GoldWing Shop Repair Workshop
GLAVIS ENTERPRISES


$48.99
$55.00
HONDA GL1000 & GL1100 GOLDWING MOTORCYCLE REPAIR SHOP & SERVICE MANUAL For 1975, 1976, 1977, 1978, 1979, 1980, 1981, 1982, 1983, 1984 & 1985 - NEW, 304 Pages
Classic Automotive Repair Shop & Restoration Manuals


$73.83
Honda GL 1800 Gold Wing 2001-2010 Repair Manual (Haynes Service & Repair Manual)
Chrome World

$231.99
$287.99
WARN 885000 PullzAll Corded 120V AC Portable Electric Winch with Steel Cable: 1/2 Ton (1,000 Lb) Pulling Capacity , Red
Amazon.com


Ya want me to cut off and send you this section from the '83 frame?
OP
OP
- Joined
- Dec 3, 2009
- Messages
- 11,031
- Reaction score
- 299
- Location
- Kingsport, Tennessee
- My Bike Models
- Former '82 GL1100 "The Slug"
[url=https://www.classicgoldwings.com/forum/viewtopic.php?p=120751#p120751:1iwsylb8 said:Steve83 » Tue Jun 10, 2014 1:28 pm[/url]":1iwsylb8]
Ya want me to cut off and send you this section from the '83 frame?
 I think you already sent me that section Steve.....
When I spoke to the welder, he was under the opinion it was going to be easier for him to cut the cross tube out of the new section you had sent to me and weld it in into the frame for alignment of the tube.
OP
OP
- Joined
- Dec 3, 2009
- Messages
- 11,031
- Reaction score
- 299
- Location
- Kingsport, Tennessee
- My Bike Models
- Former '82 GL1100 "The Slug"
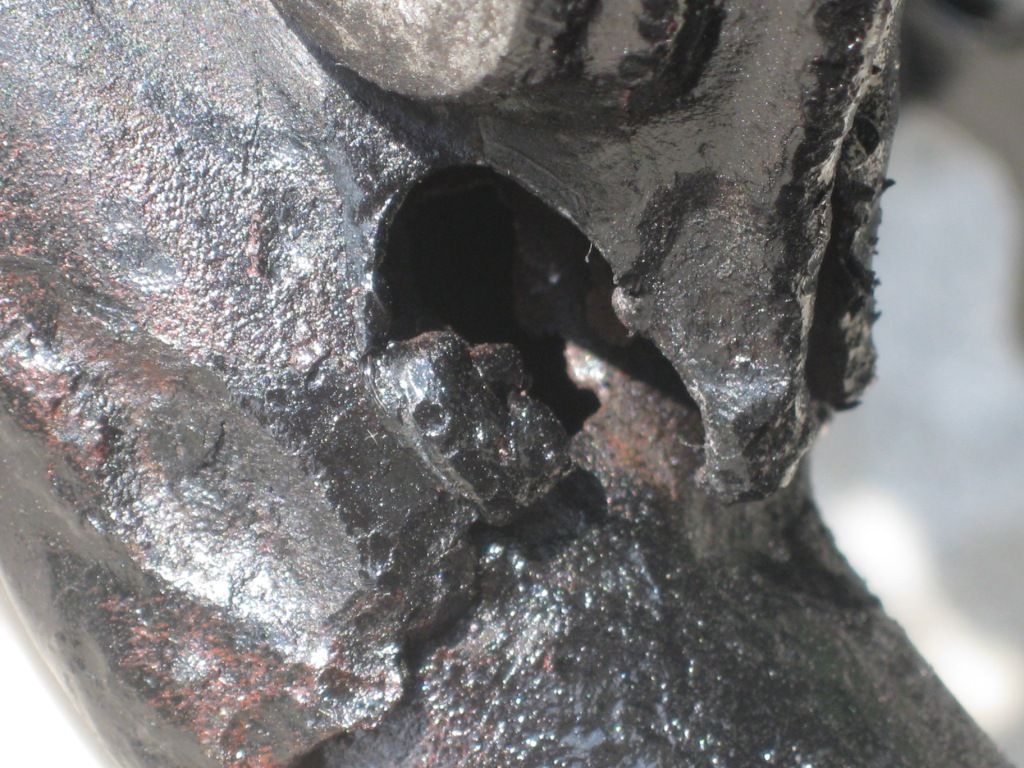
Both Brian. I can reach in and weld the hole, but it doesn't look like there is much good metal on the inside tube.[url=https://www.classicgoldwings.com/forum/viewtopic.php?p=120750#p120750:1l6vzkzl said:brianinpa » Tue Jun 10, 2014 1:27 pm[/url]":1l6vzkzl]
Are your concerns the internal hole, the external hole, or both?
Weld that sucker up and call it good! It you really want to take it further, add a gusset but I think that would be over-kill.
- Joined
- Dec 3, 2009
- Messages
- 22,446
- Reaction score
- 265
- Location
- Van Nuys Ca.
- My Bike Models
- 1983 Interstate
2018 KLR 650
2018 BMW S1000 RR
- My Bike Logs forum link
- https://classicgoldwings.com/forums/dan-filipi.122/
Think I would lay a steel bolt ( or 2) over the hole and weld it in place.
Ooh...well...that's different. Never mind![url=https://www.classicgoldwings.com/forum/viewtopic.php?p=120759#p120759:d777q729 said:mcgovern61 » Tue Jun 10, 2014 1:02 pm[/url]":d777q729]
[url=https://www.classicgoldwings.com/forum/viewtopic.php?p=120751#p120751:d777q729 said:Steve83 » Tue Jun 10, 2014 1:28 pm[/url]":d777q729]
Ya want me to cut off and send you this section from the '83 frame?

When I spoke to the welder, he was under the opinion it was going to be easier for him to cut the cross tube out of the new section you had sent to me and weld it in into the frame for alignment of the tube.

OP
OP
- Joined
- Dec 3, 2009
- Messages
- 11,031
- Reaction score
- 299
- Location
- Kingsport, Tennessee
- My Bike Models
- Former '82 GL1100 "The Slug"
I was able to get in a bit closer and beat the daylights out of the tube and surrounding area and the hole is limited to the frame tube inside. I hacked at the edges of the hole to get to good steel and the hole is now about 1/2" around. No more rust falling out and I think I have enough room now to get a piece of steel in there and make it solid again.
Cool! Weld that puppy up!
- Joined
- Jan 27, 2013
- Messages
- 9,855
- Reaction score
- 34
- Location
- Brisbane Australia
- My Bike Models
- 1981 GL1100 “Rats Nest”
1998 GL1500c Val
1987 CBR1000f “The Pig”
1991 CBR1000f Red
:good:
OP
OP
- Joined
- Dec 3, 2009
- Messages
- 11,031
- Reaction score
- 299
- Location
- Kingsport, Tennessee
- My Bike Models
- Former '82 GL1100 "The Slug"
Welding is completed!! (AGAIN!) arty: :yahoo: :yes: :Egyptian:
What a job that was! :shock:
I cleaned up the hole, ground down the surrounding area to good steel, took Dan's suggestion and popped a 3/8" bolt into the hole with the head sticking out and started welding. Needless to say, I blew more holes initially and the lower end of the foundation for the foot peg about disappeared!
Turned down the heat a bit and got that sucker welded. One last pass to tie in the new welds to the underside and BAM!!!!! NEW HOLE!!!!!!!! :head bang: :sensored: :cheeky: :crying:
The tube forward of the centerstand opened up. Tap vigorously with a chipping hammer and then ball peen hammer and I now have a new 3/4" x 1/2" slot in the tube!
Grind out for a good look. Found a lawn mower blade of almost the same shape as the tube with the bend. Chop up the blade, tack one side, heat it up and pound the shape to conform to the frame. WELD.....WELD.....WELD
Looks good and no more holes! Grind the welds to check penetration and smooth out the surface and I am happy with the results! After I get the area dressed up, I'll get some pics.
(Man this was a long time comin!!)
arty: :yahoo: :yes: :Egyptian: What a job that was! :shock:
I cleaned up the hole, ground down the surrounding area to good steel, took Dan's suggestion and popped a 3/8" bolt into the hole with the head sticking out and started welding. Needless to say, I blew more holes initially and the lower end of the foundation for the foot peg about disappeared!
Turned down the heat a bit and got that sucker welded. One last pass to tie in the new welds to the underside and BAM!!!!! NEW HOLE!!!!!!!! :head bang: :sensored: :cheeky: :crying:
The tube forward of the centerstand opened up. Tap vigorously with a chipping hammer and then ball peen hammer and I now have a new 3/4" x 1/2" slot in the tube!
Grind out for a good look. Found a lawn mower blade of almost the same shape as the tube with the bend. Chop up the blade, tack one side, heat it up and pound the shape to conform to the frame. WELD.....WELD.....WELD
Looks good and no more holes! Grind the welds to check penetration and smooth out the surface and I am happy with the results! After I get the area dressed up, I'll get some pics.
(Man this was a long time comin!!)
great gerry ... the stand has been a hassle
- Joined
- Jan 27, 2013
- Messages
- 9,855
- Reaction score
- 34
- Location
- Brisbane Australia
- My Bike Models
- 1981 GL1100 “Rats Nest”
1998 GL1500c Val
1987 CBR1000f “The Pig”
1991 CBR1000f Red
:good:
Great progress! Willie Nelson comes to mind..I just can't wait to get on the road again!
- Joined
- Dec 3, 2009
- Messages
- 22,446
- Reaction score
- 265
- Location
- Van Nuys Ca.
- My Bike Models
- 1983 Interstate
2018 KLR 650
2018 BMW S1000 RR
- My Bike Logs forum link
- https://classicgoldwings.com/forums/dan-filipi.122/
That's the way to persist and get it done. Good deal.
How long before your daughters have it back together now? :music2: