'81 1100 Standard - Restore and Sell

Classic Goldwings

Help Support Classic Goldwings:

This site may earn a commission from merchant affiliate links, including eBay, Amazon, and others.

mcgovern61

Well-known member
Staff member
Moderator
Supporting Member
Joined
Dec 3, 2009
Messages
11,031
Reaction score
299
Location
Kingsport, Tennessee
My Bike Models
Former '82 GL1100 "The Slug"
The '81 1100 Standard we acquired recently is going to be a fixer up and sell. The price was right! (Another donated bike.) :yahoo:

It is a great color and the paint is real nice:
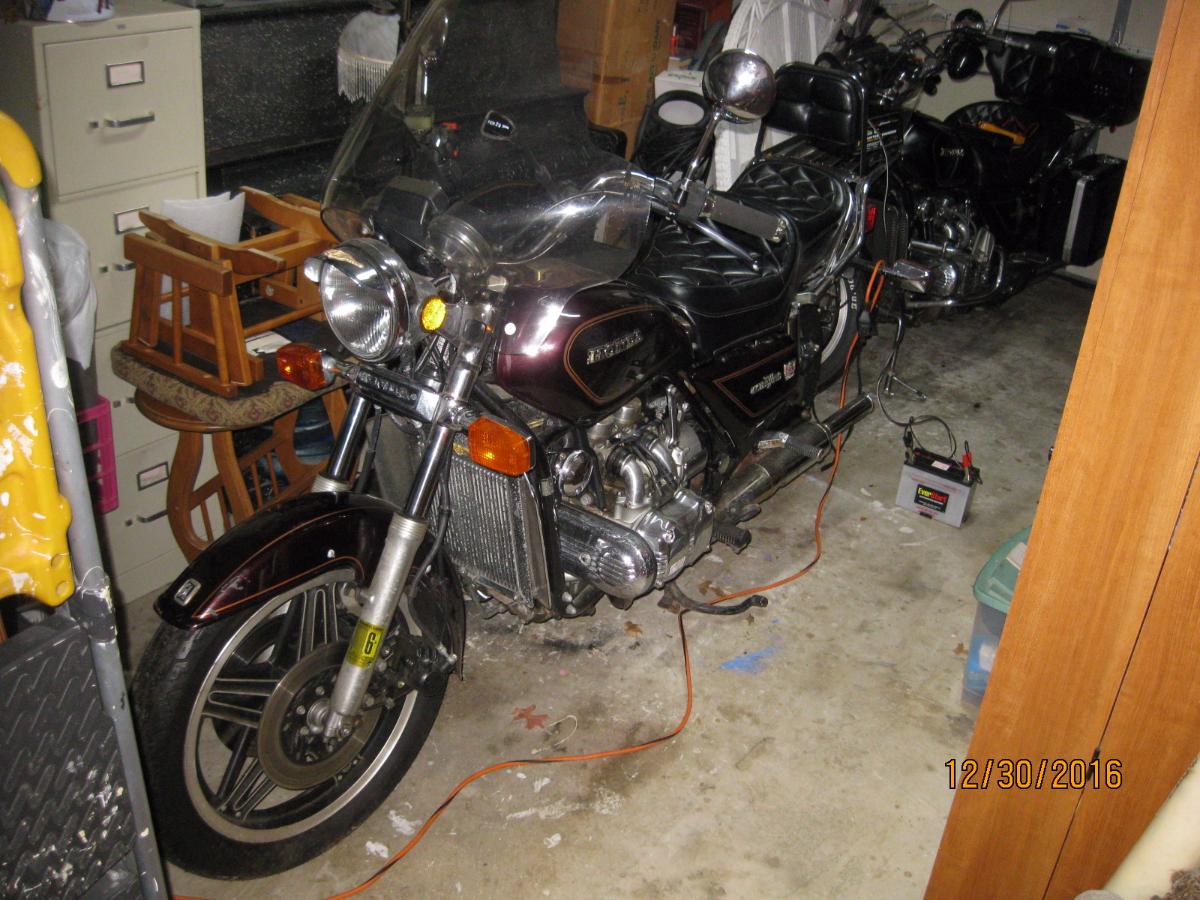
image.php


It was for my daughter, but she is just too short to ride it. :crying: So, we are going to get her back on the road and sell her. So far the list includes:

*Rebuild of front brake calipers - right side missing dust seal and rusted. (Might need a piston) Rear brake line is new!
*Front Master Reservoir kit and lid (leaking when brake fluid pushed up).
*All new brake pads - polish up rotors
*Replace all fluids (obvious)
*Timing Belts
*Battery
*carbs cleaned up (and fix if needed)
*Gas tank flush (although looks pretty darn clean now.)
*Rear turn signals (both broken off and held with tape) Replacements already on the way.
*General electrical clean up, aluminum clean up, polish chrome.
*Polish the forks (new seals were done just under 3 years ago and bike has been sitting since).

The tires were brand new 3 years ago, almost no miles on them and no signs of breaking down. I need to check the tire codes.
 
So far, the shock and forks are holding air. I have my used Progressive fork springs if I need to swap them out. Brake fluid looks rough. Most everything else seems respectable! :yes:

Other than cost to purchase the parts, this could be a quick turnaround for a spring sale! :moped:
 
[url=https://classicgoldwings.com/forum/viewtopic.php?p=185948#p185948:7oxjlq5d said:
joedrum » Yesterday, 8:55 am[/url]":7oxjlq5d]
hmmmm im so mad your daughter not going to be able to ride this bike sheesh :Awe:
It's not her fault she's short. :BigGrin:
 
[url=https://www.classicgoldwings.com/forum/viewtopic.php?p=185939#p185939:10mzxts6 said:
mcgovern61 » Fri Jan 13, 2017 12:05 am[/url]":10mzxts6]The '81 1100 Standard we acquired recently is going to be a fixer up and sell. The price was right! (Another donated bike.) :yahoo:

It was for my daughter, but she is just too short to ride it. :crying: So, we are going to get her back on the road and sell her. So far the list includes:
I think you will be able to command a higher price if you can show how good a cook she is!
:smilie_happy:
 
Round 1! :builder:

Puts some air in the tires and rolled her to the back of the garage. Pulled the plugs and gave the engine a turn over by hand (turned nice and easy!) Oil actually looks brand new. Swapped the battery out of the '82, disconnected the gas line and spun the engine with no plugs. :shock: Gas flew everywhere!!! :oops:

After going back and wiping down half of the items in the back of the garage to get the old stinky gas off everything, we put the plugs back in and tried a start. Only a few puffs.

Next, I set up my lawnmower test tank with a hose connected to the fuel pump and tried again. Flooded out right away. Dropped the temp gas tank below the carbs, pulled the plugs and emptied the cylinders, and tried again with the tank raised a bit. Started right up!! :party:

BUT, the smoke was awful! Talk about gas in the pipes! The gasoline was practically flowing directly from the carbs into the engine! We went through about 1/2 gallon of gas in 3 minutes of running at 3K RPMs. :hihihi:

What did we learn? Carbs need a complete cleaning and rebuild, there are numerous exhaust leaks, the stator works fine, the engine is otherwise smooth!
 
Once the smoke cleared, we ran the carbs dry to prevent any further leaking into the engine. Even though the oil looks good, I will be changing it anyway. No waterpump leaks and no overheating so that is a good sign. Could not run long enough to see if the radiator fan would come on, but the temp gauge did work.

Next we focused on the rear brakes because there is a brand new hose on the caliper. Piston is stuck and making the pads rub. Pulled the caliper and it appears to have been rebuilt with what looks like brand new pads. We pushed the piston back in and flushed the rear system with fresh fluid. Pushed the piston out to near the end and then opened the bleed screw and pushed out the fluid form there. Piston out again and force all the way back in to be sure the return was clear. Bleed the air and install back on the rotor and the rear brakes are working correctly!

Money spent on the rear....$0......we had a whole can of new Dot 3 oil on hand. :music:
 
Carbs are off the bike! :yahoo:

Carbs needs a serious cleaning and rebuild. :cheeky:

There are leaks at almost every seal. One of the idle pilot screws are broken off. There is nasty black bits and goo stuck all over the place. There is that wonderful green nasty slime from carbs that sat for nearly 2 years with gas in them. The float valves are all stuck in place. With some careful persuasion, I got them out only to find even more nasty black goo.

image.php


image.php


image.php


This going to be our first carb cleaning and rebuild in house. Wish us luck! :yes:
 
Ordered a new inexpensive ultrasonic cleaner from Ebay ($88 shipped):

1. Tank Material: Stainless Steel SUS304
2. Heating Power: 100W
3. Ultrasonic Power: 120W
4. Frequency: 40kHz
5. Power Supply: AC110V 60Hz
6. Tank Capacity: 3 L
7. Time Setting: 1 - 30 minutes (LED Digital Display)
8. Temperature Setting: 0-80 degrees Celsius
9. Transducer Quantity: 2 set
10. Tank Size: 9 1/2"×5 1/2"×4" (L x W x H)
11. Ultrasonic Cleaner Size: 11"×7"×8 1/2" (L x W x H)

It is bigger than the Harbor Freight unit. This unit should go a long way in helping to clean up the carbs. You can only fit one disassembled carb at a time, but I have seen the results on various videos using this machine and it seems to work good for them. I consider it an investment in a tool that I have many more uses for.

image.php


image.php


image.php
 
We have thoroughly flushed the front brake lines, master and calipers. Handle works good and it tightened right up again no problem. The reservoir had to be replaced since it was warped at the lid. Even with the reservoir off, the master bled out real easy and I got a nice tight handle. The return hole is clear as well as the primary hole. New reservoir installed and all checked.

Just waiting on the caliper seal kit to get here this week. We ordered them 2 weeks ago, but USPS lost them in the mail (in my development no less)! I have a notice from the Post Office verifying the kits were scanned for delivery in our development, but the temporary Postal Carrier was having a bad week and lost a lot of mail that week. A lot of people here did not get their mail correctly. Ebay refunded the money since it was not the Seller's fault and I could prove via USPS that they lost the package. I ordered a different kit from Georgefix instead.

Pulled the front fender, front wheel and calipers. While off, I am polishing the forks.
 
The front brakes are done! Lesson learned.......even though we flushed the front brakes with new fluid multiple times, pulling the pistons revealed that there were still plugs of water and rust sitting behind the pistons! :shock:

image.php


image.php


The lesson for me is, pull the pistons and completely clean the calipers no matter whether they move or not. A bike that has been sitting for years will have water in the brake fluid.

Dropped the parts into some Chem-Dip to start the clean up. I only let the parts sit for 10 minutes since Chem-Dip will peel paint. :hihihi:

image.php


image.php


Once cleaned up, I realize the calipers are not painted with just good quality black paint, but it is the same vinyl dip (or whatever it is) that is on the brake and clutch handles. I found a small spot where it was scrapped off and the coating is fairly thick. After cleaning, new seals, new rubber boots, steel wool for the pistons and cylinder bore, caliper grease and fresh brake fluid, the brakes are going back together.

image.php
 

Latest posts

Top