82 gl1100 carb problem

Classic Goldwings

Help Support Classic Goldwings:

This site may earn a commission from merchant affiliate links, including eBay, Amazon, and others.
bike ran well before working on #3 carb and polishing slides. tryed 11/4 turns 2, 21/2, 3 turns it will just bearly run without choke. will not idle less than 1500 and idle adj. screw does not change rpm's much I found that you can adj. mixture screws with fingers with a rag on hotter spots. But there is not much change really. could they just need sinking. I have a very loud carb knock. Last certainly not least I just learned about Mr.joe drum .I wish your good friend the best this is a bad day to ask for assistance. thanks to all who replyed. Jerry rasied in Fairmount Ind. live in Elwood Ind.
 
jpwinger":3th0gb1r said:
Changed to 82 carbs because 80 carbs were froze when I got bike sat for 14 years. Put after market carb kits in (not randaks!!!!) Couldn't get it to run right sooo tryed to change air setting's one of those was froze and broke off. Found 82 parts bike that hadn't set as long. Air screwas were ok .New kits came with new screws so I used them. Did not realize that I could just cut tab to adjust on 82 carbs. Changed new carb kits to 82 carbs. Had spark knock sinked and that became much better. Carb #3 heated up much slower than others and seemed to cut out at idle. Slow speed jet tiny holes were dirty so cleaned and slid was sticking, polished. then ckecked other slids and polished them. That's when Things went south. Bike ran well and started on first push on starter button. Only thing I really change was the air setting.

At this point I've only worked on CX carbs but will be into my 1100 carbs as soon as Randall is back from vacation (Randaak's is closed until April 2nd) However, I can't see THAT much difference in the basics between the carburetors. When you broke the Air mixture screw off, did you recover the tip that broke from the Carb? Chances are you can see it sticking up through one of the idle circuit holes located in the venturi, likely on that carb it would be the hole just in front of the butterfly (when closed). if the tip of the broken screw is protruding you will never be able to adjust that carb until the obstructing tip is removed. The idle system circuit is usually the culprit in cases like this. I can't stress this enough from my limited experience that this is the source of problems 90% of the time. Because of where it's located, a bike that sits for any length of time with today's fuels which attract water will get deposits all around and IN the emulsion tube holes. From what I can tell that slow jet (or emulsion tube) is the same on all of these carbs. The small hole which runs down through the center is .018 and the 8 on the sides are .026. I know this because I have punched them out with wires and drill bits in the past screwing up several until I finally bit the bullet and measured the proper size. I now take a hand held pin drill holder and clear out all jets to proper factory sizes when rebuilding. In addition to the deposits building up on the jets (other jets are different sizes; I'm talking only about the slow jet here) the deposits that built up are in the idle circuit from the chemical reaction surrounding the slow jet. You must make SURE that circuit is clear and the best way I have found is with the ultra sonic bath using 1part simple green HDpro and 3 parts water. The HD pro won't hurt the aluminum and I run them through several cycles until I can see the free flow of carb cleaner coming out of ALL holes in the idle circuit when sprayed into the slow jet hole.

If similar to others, if you look down into the venturi with the butterfly pulled back you will see some tiny holes. one in front of the butterfly and likely two behind it. They are the holes for the idle circuit, for closed idle and off idle system. Those must be clear. The front one will be where you can see the air mixture screw stick out when fully seated and is also where the broke off tips get stuck. If that has happened you can take a push pin, hold it in some needle nose pliers and carefully push the tip to dislodge it and get it out of the system. You don't want to damage these holes. Additionally I take a welders tip cleaning wire of the proper size and make sure the holes are clear. That's the entire idle circuit.

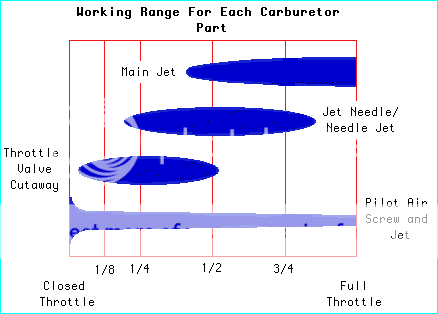
While the other jets come into play at different RPM's, the idle circuit is in play throughout the ENTIRE range providing fuel. Any obstruction or restriction in that circuit will affect the smooth running of the bike. There are 4 carbs and it will only take ONE to drive you nuts trying to tune and sync your bike.

Like I said, I'm new here and you guys will have to take this with a grain of salt but I'm 65 and bought my first bike when I was 14 so I've pretty much been through this before. Not saying this is the problem but sure sounds like it and unless you are absolutely sure that slow jet and idle circuits are clear all the rest is just guess work. Just trying to participate and help a fellow rider.


The chart below illustrates what I'm talking about when stressing the importance of that idle circuit.

WorkingRangeforCarbJets-1.png
 
dan filipi":2d120no4 said:
You did an excellent job stating the importance of a completely clear idle circuit sidewinder. :thanks:

Thanks Bossman .... It's just that I've bought a bunch of bikes cheap from folks that went into the carbs, had bad results due to that very thing and finally in frustration threw up their hands and wanted rid of the bike that day. It can be fixed, don't give up.

Also most after market air/mixture screws don't really come up to snuff. A way around this is to buy a Kawasaki screw set P/N 16014-1080. It's the exact same air/mixture as the 1100 and many other Honda's and has the spring, washer and Oring. Won't fit the 1000 though. The QC and tolerance's will be factory as opposed to Chinese knock off. I understand you can buy just the screw itself from Kawasaki but it cost even more than the whole setup. Just saying, more ways to skin a cat if you dig deep enough.
 
Carbs that I broke needle aren't on bike,80. 82 carbs ran well with the exception of #3 carb untill I started working on #3 carb which had dirty slow emultion tube cleaned holes on side ,but can't fine or clear very small that runs thru center top to bottom. I checked all emultion tubs can't find or clear center hole. tryed brake parts cleaner to clear center hole I have been runing atf in gas. I will check again the center holes in venture and boil and soak tubes. The thing I can't understand is it ran well before I messed with #3 carb. And changed mixture needle's, doesn't run well enough to set mixture needles yet. thanks again for all the replys and info.
 
try e string on the guitar.....i usealy lock the e string in vise grips mostly or vise ....then lightly turn the jet on top of e string never pusking down hard .....its useless to put more pressure than the string can clear....bend in the string is a sure sign you doing something other than strait in cutting ....each jet may take more than 15 minutes to clear or longer........boy when you get this job done your gooing to think someone put rocket fuel in the tank
 
Two statements:

Sidewinder....GREAT information thanks!! :thanks:

JPwinger....I am under the opinion that your sync is waaayyy off now! I suggest taking the carbs off and performing a dry sync first. I do not know if you have done this before but for the sake of time....adjust all carbs to zero (butterfly visibly closed) and then open then each 1 turn until you see the butterfly move..stop! Use a small wire (guitar string size) and place a piece between each butterfly. Tighten until they are all just touching the wire.

Reinstall on the engine and run engine until hot. Now try to sync with gauges. Hope this helps!
 
Thanks joe, Sidewinder I have old guitar to donate high e string will be pulling carbs again 4th time in two days.I have some old yamaha carb dip saved from last year maybe it is still good will soak in it . then try high e string. Checked sink with gagues yesterday all were close.. I don't understand that, the way it runs they should all be way off. between dip, brake parts cleaner and boiling jets should clear up . Idle curcuits on carb bodys will be checked too. I hope I understand the part I need need to clear is the tube with the holes in side ,is the center hole that I can't find.,, holes on side are good and clear. And I will try the bench sink. and set mixture screws three turns out for 82 carbs. Thanks so much again
 
Synchronization has almost nothing to do with fuel mixture or delivery. What is being synchronized is the opening of the carb slides.
 
slabghost":5wa6svzx said:
Synchronization has almost nothing to do with fuel mixture or delivery. What is being synchronized is the opening of the carb slides.
I agree....except from personal experience when I was first working on my '81 carbs with a similar issue, as I tried to sync and get the bike to idle I had messed with almost everything in an attempt to settle it down. The only thing that worked was going back to ground zero.....resetting the screws and butterflys and staring over. After that I was able to at least realize how far out I had adjusted everything and was able to finally dial them back in.
 
well soaked in brake parts cleaner. boiled in distilled water. still can't find hole in center of jet. the jet I am working on is the one that is one pc that is recessed in one of the towers one that is screwed in and is the smaller of the tubes. is that the slow speed one ???? The other is two pc and is larger and screws together then in one of the towers. those are good a clear. The smaller one looks like it should have hole in center top to bottom about mid way down the lower part has small holes on the side (one side to the other side).. those on sides are clear. Please allow this stupid question Im haveing a stupid moment.
 
jpwinger":127pnx3f said:
Carbs that I broke needle aren't on bike,80. 82 carbs ran well with the exception of #3 carb untill I started working on #3 carb which had dirty slow emultion tube cleaned holes on side ,but can't fine or clear very small that runs thru center top to bottom. I checked all emultion tubs can't find or clear center hole. tryed brake parts cleaner to clear center hole I have been runing atf in gas. I will check again the center holes in venture and boil and soak tubes. The thing I can't understand is it ran well before I messed with #3 carb. And changed mixture needle's, doesn't run well enough to set mixture needles yet. thanks again for all the replys and info.

Those center holes can be a bear to clear out. It comes from water in the fuel and sitting to evaporate leaving deposits from hell. MOST of the time you can soften it up with chemical and boiling OR an ultrasonic cleaner. Harbor freight sells a cheap one for smalll parts and another for around $89 that will take an entire carb body.

I had one about a year ago that just would not clear out so I drilled it out with the smallest drill bit I had .... BIG MISTAKE. That what go me to checking the proper sizes. I am almost sure the 1100 will take a .018 drill bit to clear the hole properly. That's what I use on CX and other GL carbs. It's a tiny bit and you can get that size at a jewelry supply store or some where like Mcfadden Dale (that's where I got mine). I bought a hand held pin drill holder to use with small bits. You can just clamp the bit into a small vice grip and SLOWLY begin to twist the bit into the center of the hole. You will see the calcium bits come out as you twist and tap the tube. Take it slowly and it will easily clear the hole the perfect size to factory specs. Someone here wrote to drill it out to .019, and he said he did and never needed to use his choke. Think about that ... 1 1/1000 more in the idle circuit and no choke needed. Says something about how sensitive the flow to that circuit is.

I almost guarantee if you can't see daylight through that tube, that's your problem with that carb.

If you find a source for the .018 drill bit locally then you may as well pick up a .026 for the 8 side holes. Even after soaking and cleaning there is still a slight layer of buildup after years of use and you will be surprised how much better one will run when those jets are brought back to factory specs. Hey, it only cost a nickel more to go first class and with all the trouble to remove and disassemble those carbs, one may as well do it right. On these old bikes, simply taking them apart and tanking them won't do the job properly.
 
OH, and should you get the proper bit and begin to drill it out, make sure to take it easy and keep it centered. and do it by hand. The hole is tapered from the inside to promote flow, so you don't want to go scratching up the inside of the tube near the hole too much. The top 2/3 of the tube matters not as the fuel piles in to be restricted at the hole itself, that's why it doesn't hurt to use a screw extractor on those models that are pressed in.
 
Well, After a long search I found the EXTRA PARTS from the ( after market carb kits) I used. installed the smaller of the jets from the kits. They were the one I wasn't sure I was getting clean. Installed carbs. Now it runs at 4000 rpm, no choke,can't idle down with idle adj. screw!!! intake runner for #3 carb is ICE COLD. all others normal. Checked choke and cables all seem to snap back like they should. I had set mixture screws at 21/2 turns out. Exhaust header heated all heated up about the same. What is wrong
 
Hmm, check all your steps and make sure the linkage isn't binding.
For the engine to run up that high the throttle plates have to open to let air in, they must be open somehow or there is a vacuum leak, possibly at the intake boot's or at the heads where the Orings are. Those Orings can sneak away from their seat and leak air past.

If you had the carbs separated from the plenum, is the linkage together proper?
 
now is the time to to check the sync ....i would loosen all sync lock nots .....turn them all 1/4 out and keep doing it till the motor starts slowing down ....if it dont something else is going on ....maake sure idle set screw is out of the game and not touching the stop....
 
Thanks for the replys again. It was late last night, so just stoped. Will looking closer at linkiage, o rings at head, they have been crushed a lot. Will be hooking up gagues .And compression test. Thanks again for your great knowlege and experience. What about #3 carb intake runner that is running so cold with vapor lock.
 

Latest posts

Top