82 interstate refurb

Classic Goldwings

Help Support Classic Goldwings:

This site may earn a commission from merchant affiliate links, including eBay, Amazon, and others.
Surprisingly the decals are applied in the same manor as models. Wet them then slide them into position and dry them off. Pretty simple.
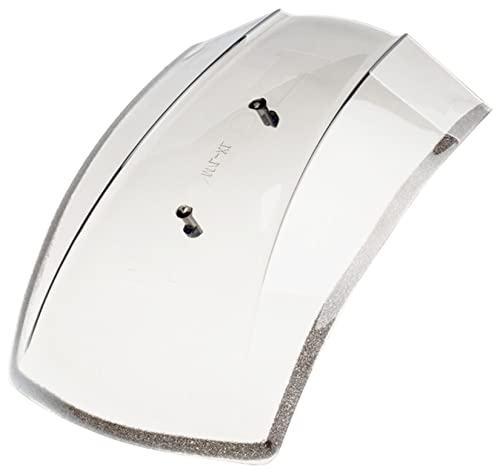
Got my fairing off and dicovered it was broken on the right side where it bolts to the mount. Maybe fixable but found a decent replacement for about $300 shipped.
Paint is coming, too. Expensive stuff. By the time I'm done I will have what this bike is worth into it even though I got it for free and doing all the work myself including paint. It'll be real pretty. And isnt that what its all about, after all?
Ill post a few pics when ready for paint. Maybe a video showing the process of laying down a candy paint job if I get it figured out.
 
Well
I have a few hundred miles on this bike. I have to say it is a very comfortable ride, and runs very well. Learning how to ride it has helped. This bike does not have much low end torgue so I shift it a little differently than my BMW R50 - which is more like a tractor. That helps quite a bit. I also learned the hard way to be sure the saddle bag covers are locked when riding - especially on the highway. Apparently I'm not the only one who lost a saddle bag cover. Bags are plentiful on ebay but very few have covers. I need the starboard side if anyone has one.

I only have a few items I want to address. Timing belt tensioners have been mentioned but I am not convinced yet that there is an issue. I'll follow up on that. The fairing inners (the part you look at while riding) needs some help. It has been cobbled together. The problem is I don't know what they had for covers over all the openings before the PO did his thing. Some of them are "soft" vinyl or something like that riveted to the hard black plastic shell. I am probably dreaming to think any of those parts would be available so I will likely end up fabricating something decent. I may install a stereo system. Definitely want a power outlet so I can charge the phone. Probably just a cigarette lighter style. Simple and easy to find. If I put in a Stereo there will be a USB connector for that. I am also interested in adding a little trim to the bike. This bike can handle some bling. I have noticed pics of Interstates with added trim at the bottom of the bags. I'd like to see what that involves. Looks like part of the guards but haven't found a source.
I've got a thread on how to rebuild the tensioners idlers look I up it's under (timing idler mods) it's simple and easy I included all parts needs
 
Turns out my fairing is broken on the right side where it bolts to the mount. That explains why the pockets on the right side are also broken. The bike must've gone over at some point hard enough to break the fairing. Found a replacement in pretty good shape but shipping is crazy expensive. Still, in the long run I believe it's worth it. With the fairing and paint and what I already did to clean it up and make it road worthy, I'll have about $2,500 into this bike (I got it for free). It might be closer to $3k with all the miscellaneous stuff but still not bad for what I'll have when it's done. Pretty sure I could get me money back but that's not the point is it? I don't consider my time as a cost. I enjoy this too much and the riding alone is payment enough.

One thing I have noticed is I need to keep the air pressure pretty high on the rear shocks to keep it stiff enough. I have not ridden 2-up. I'm 215 lbs and don't carry much in the bags or trunk. First time I bottomed out bike was empty except for me and I had about 20 psi in the shocks. They don't leak, either. No problem with front shocks.
Hey look on my GL1100 restoration thread those fairings are bad to break in that exact spot it probably didn't fall over it probably had a brake fluid leak and it caused the ABS to deteriorate if you look on my thread it'll show you how to fix that you can take you can take a soldering iron and stitch the plastic back together where it's cracked and if there's holes in it you can take an old piece of ABS plastic and melted into it it works really good if it's in an inconspicuous place
 
Well I'm pretty close to shooting the new paint job. Everything is off and apart and sanded. I am building a 10'x10' paint booth in my barn. Should have that completed this weekend. Next weekend No work will be done, my son is in town to run the marathon. Weekend after - painting.

I just put my extra crash bar parts on the part for sale forum for free if anyone needs any metals. I had a bunch of extra stuff and its taking up too much room.
 
Paint booth is up and ready.
I bought a canopy 10x10 canopy tent and wrapped it with 6 mil plastic. Added a zipper door.
Used the vent in the top of the tent for a return - stuck a filter under it and added another return in a side wall. Bought a high velocity exhaust fan with a 30' tube to direct exhaust outdoors. Put a couple filters over the exhaust hole in the plastic. I think this will work well. it should give me enough room to paint everything at once. Hung a couple 10,000 lumen shop lights in it. The whole thing cost ~ $600.00 and it is all collapse-able and re-usable. Got the tent and fan on-line about $300 total for those. The rest is Home Depot.
 

Attachments

  • 20240407_155942.jpg
    20240407_155942.jpg
    1.2 MB
  • 20240407_155950.jpg
    20240407_155950.jpg
    1.6 MB
I have never put on a candy tri-coat paint job. This should be interesting. The paint cost $1,200 so it is quite a gamble. I won't count the paint booth as a direct cost for this bike because I plan to use it again. That said, if this comes out nice, I'll be about $2,700.00 all in on this bike. I should be able to come close to break even if I decide to replace it with another reclamation project. I hope all the hype about how difficult it is to lay down a candy paint job is just that. I'll know in a couple weeks when I can get back to this project. Stay tuned...
 
Paint booth worked well. I got my paint from VMR Paints. Excellent products and service. Highly recommended. Color is spot on.
The paint job wasn't that difficult. As long as the gun is set up correctly and you are careful with your technique, it goes on very nicely.
Next is decal pinstripes and clear. Then cut and polish and put her all back together again.
 

Attachments

  • 20240505_174607.jpg
    20240505_174607.jpg
    2.9 MB
  • 20240505_174620.jpg
    20240505_174620.jpg
    1.6 MB
Soda blast on aluminum is a good place to start, then polish, then mothers polish for protection once a year. Clear coats are prone to yellowing too soon. Duplicolor cast coat aluminum color (#1615 I think) is a very close match to honda motor silver. Chrome covers are aftermarket and prone to peeling. The motor pictured is polished, not chrome.
That is worthy of a place in an art museum.
 
Getting very close to completing this project... finally
One thing I ran across is the rivets needed to re-attached latches to bag lids, etc..
I am finding that the 1/8" rivets are too small but the 3/16 rivets are too big. Need a Goldie Locks size rivet.
These also apply to the shelter (faux gas tank). There is a metal frame under the doors that is rivetted to the sides of the shelter. Did a little research and found there really are no metric rivets. The closest thing I could find are 5/32 inch rivets that happen to be 4mm. I think that may be what I need but of course not readily available locally. Also not sure if I need a different bit for my rivet gun.
Should have it all back together this coming holiday weekend. About 6 weeks behind schedule but I honestly had no idea how involved a simple painting project would be. There are 18 painted body parts on the Interstate. Most have pinstripes. Most have emblems, lights, reflectors or some form of embellishment, too. Many have latches or other things rivetted to the parts. It was a full day to get the fairing back on and fully together alone!
Progress pics attached Completed Project pics to follow in a week with any luck..
 

Attachments

  • 20240630_150031.jpg
    20240630_150031.jpg
    3.9 MB
  • 20240630_185934.jpg
    20240630_185934.jpg
    4.2 MB
Yes for a second.
Then I thought about trying to get those tiny nuts to srew onto those tiny bolts. I think blind rivets are the only answer for the shelter cover frame. Nuts and bolts would wotk fine for latches.
 

Latest posts

Top