That is 2" across the outside edge of the intake port flange surface.
You are using an out of date browser. It may not display this or other websites correctly.
You should upgrade or use an alternative browser.
You should upgrade or use an alternative browser.
hooch getting a new fuel source
- Thread starter joedrum
- Start date

Help Support Classic Goldwings:
This site may earn a commission from merchant affiliate
links, including eBay, Amazon, and others.
thanks brian its right there .. I think I will ply the deal with washer first on head that has better lip ...bar and then cover washer too and lets not forget the whole grain non gmo cereal gaskes either LOL
[url=https://www.classicgoldwings.com/forum/viewtopic.php?p=110812#p110812:g3pfe8b0 said:joedrum » Sun Feb 23, 2014 8:59 am[/url]":g3pfe8b0]
thanks brian its right there .. I think I will ply the deal with washer first on head that has better lip ...bar and then cover washer too and lets not forget the whole grain non gmo cereal gaskes either LOL
Might even be able to tin solder the washer to the grab bar flange. I think I read somewhere that you could solder SS if you used the right kind of flux.
As an aside and for someone who is going with a 1 1/4" grab rail: remember how I brazed those brass doughnuts to the bottom of my grab rail flanges in order to get the O-ring seal and to raise my manifold up 1/4" to clear the top of engine. Well after I did all that I was looking through some stuff from an old Suzuki GS750 I had and found some intake boots. Guess what; they are a direct bolt on to the GW intake (bolt size and spacing the same) and a 1 1/4" OD pipe is a perfect fit into them. Could have saved myself a lot of trouble.
Brian
Brian
- Joined
- Dec 3, 2009
- Messages
- 22,463
- Reaction score
- 275
- Location
- Van Nuys Ca.
- My Bike Models
- 1983 Interstate
2018 KLR 650
2018 BMW S1000 RR
- My Bike Logs forum link
- https://classicgoldwings.com/forums/dan-filipi.122/
My flanges to head sit well on the head but even with good surface area contact, flanges belt sanded flat, and using thick gasket material, I had air leaks. 2 generous layers of spray on copper coat provided a good seal.
I futzed a bit trying o rings but with no groove for them to sit in it was iffy at best getting them positioned properly.
Just passing on what I've tried and failed and what worked.
I like those GS flanges.
I futzed a bit trying o rings but with no groove for them to sit in it was iffy at best getting them positioned properly.
Just passing on what I've tried and failed and what worked.
I like those GS flanges.
well things are somewhat moving along .....I found some pvc connectors to help line up the runners ..they stick in intake port and stick out some so the runners fit on ports at the right spot ... I at least now know where to make bolt hole slot for adjusting the type4 to get best runner length ... it seems it might not be possible to get it the best and still fit the cavity of bike frame where the carb has to be but will really try hard to ....

$41.81
$54.95
Clymer Honda GL1200, 1984-1987: Maintenance, Troubleshooting, Repair (Clymer Motorcycle)
Haynes Repair Manuals

$9.95
$14.95
BELL Vortex Hinge Plate Kit Street Motorcycle Helmet Accessories - Black/One Size
Movatik

$5.33
$6.49
Pink Balaclava Ski Mask Head Mask Full Face Mask Windproof Sun UV Protection Hood for Women Men
Ligart

$76.00
Honda GL 1800 Gold Wing 2001-2010 Repair Manual (Haynes Service & Repair Manual)
Clickgoodwill

$32.09
$59.95
Honda GL1800 Gold Wing 1800 (01-10) Haynes Repair Manual (Paperback)
Haynes Repair Manuals

$150.00
1984 Honda Gold Wing GL1200 Factory Service Manual Dealer GoldWing Shop Repair Workshop
GLAVIS ENTERPRISES

$46.95
Harley-Davidson Trailblazer #1 Logo Duffel Bag w/Adjustable Strap - Rust Vintage Large
Wisconsin Harley-Davidson

$55.09
$58.00
WILD HEART Waterproof Motorcycle Duffel Bag PVC500D Double-bottom With Rope Straps and Inner Pocket 40L 66L 100L for Kayaking, Camping, Boating,Motorcycle
ZHONGSHAN WILD FRUIT OUTDOOR

$35.37
$45.95
Show Chrome Accessories 52-696 Honda Goldwing GL1800 01-10 Radio Panel
Amazon.com

$129.00
Sena 30K / 20S / EVO Helmet Clamp Kit for Honda Goldwing CB Helmet Accessories
ProRidersClub

$50.07
M506-2 1993-2000 Honda GL1500 Goldwing Clymer Motorcycle Repair Manual
Classic Automotive Repair Shop & Restoration Manuals

$100.00
$169.99
1988 Honda Gold Wing GOLDWING GL1500 Service Shop Repair Manual OEM FACTORY 88
GLAVIS ENTERPRISES

$48.99
$55.00
HONDA GL1000 & GL1100 GOLDWING MOTORCYCLE REPAIR SHOP & SERVICE MANUAL For 1975, 1976, 1977, 1978, 1979, 1980, 1981, 1982, 1983, 1984 & 1985 - NEW, 304 Pages
Classic Automotive Repair Shop & Restoration Manuals
seems like a nice day to get some stuff done... :builder: :mrgreen:
Go for it Joe.
Slotted bolt holes is a great idea.[url=https://www.classicgoldwings.com/forum/viewtopic.php?p=110826#p110826:311t592z said:joedrum » Sun Feb 23, 2014 12:58 pm[/url]":311t592z]
well things are somewhat moving along .....I found some pvc connectors to help line up the runners ..they stick in intake port and stick out some so the runners fit on ports at the right spot ... I at least now know where to make bolt hole slot for adjusting the type4 to get best runner length ... it seems it might not be possible to get it the best and still fit the cavity of bike frame where the carb has to be but will really try hard to ....
Joe,
Are you going to heat your plenum?
Are you going to heat your plenum?
well brian it seems to working great ... it bright and sunny out but temp is down ..cant stay out to long but it seems I will be marking runners for cut soon ...
yes I think I am going to heat plenum but will get this together first ...then heat ... as it will have to fitted after this in progression of things :builder: :mrgreen:
yes I think I am going to heat plenum but will get this together first ...then heat ... as it will have to fitted after this in progression of things :builder: :mrgreen:
Joe,
I know that you know how to cut a piece of pipe but thought this might help someone else following this thread.
For cutting the grab rails I used wood blocks to hold the rail in the vise. Just cut hole in wood using hole saw then cut it in half.
Also I found that fine tooth hacksaw blades do a very nice job on the SS.
Brian
good jig brian ...I like it ..but I am hacking by hand by the computer and blabbing with v
slabghost
Well-known member
Real nice pipe vise.
- Joined
- Jan 27, 2013
- Messages
- 9,855
- Reaction score
- 34
- Location
- Brisbane Australia
- My Bike Models
- 1981 GL1100 “Rats Nest”
1998 GL1500c Val
1987 CBR1000f “The Pig”
1991 CBR1000f Red
+1[url=https://www.classicgoldwings.com/forum/viewtopic.php?p=110904#p110904:17w3w086 said:slabghost » Tue Feb 25, 2014 5:40 am[/url]":17w3w086]
Real nice pipe vise.
things were cold today camera didn't work .. I didn't work well ... but runners got cut three came out rather good one is a bit short not to bad but I am not pleased with it myself ...but things happen that were just to hard to get right and mark well ...
It also looks like the grab bar runners will need a 1/4" spacer or a bit more ... to clear everything in the middle ...
maybe tomorrow I will get the hose I need for the type4 ... for the connectors to runner ... once I get all that together I can see what It takes to space the deal off the center section ...
:shock: still in temp shock
ok I am sorry guys .. I have completely lost it on pics or video ... I cant get either one to work ...
but the progress is quite good ... had to spend 20dollars for hose that would work ... small town nothing available deal ... as it turns out I used all the hose but the bell end ... the runners are cut quite good ... as in fit .. but there was no way to equal the lengths up and fit carb in bike frame without cutting ..
the hose I got fit both pieces well .. and on the runners I have 3" plus on each runner ... and all you can get on type 4 also I don't see it leaking with out clamps let alone with them ...
it setting right on the center section thermostat housing ....so I am going to make some spacers out pf something to raise it some ..
so this is where I am at if I can get video posted I will its kind of hard to see things but its a whole lot better than my typing about it ...sheesh :help: :whip: :thank_you:
We'll Joe, you were going to put some big washers in for flanges so maybe you can find some that are 1/4" thick.
Brian
Brian
slabghost
Well-known member
That big of a flat washer will almost certainly be very thick.
well ..I just went crazy and pushed all kinds of buttons everywhere and got the camera to work :hihihi:

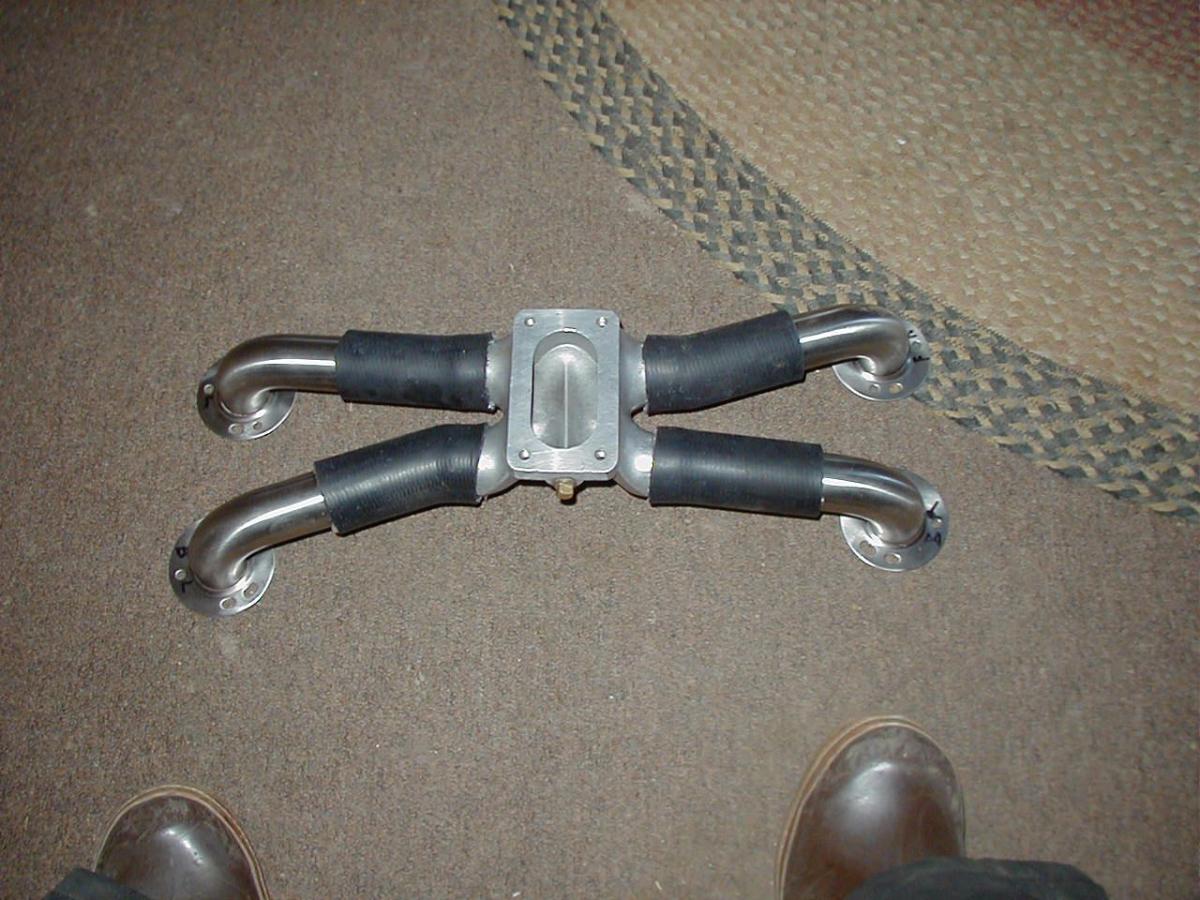
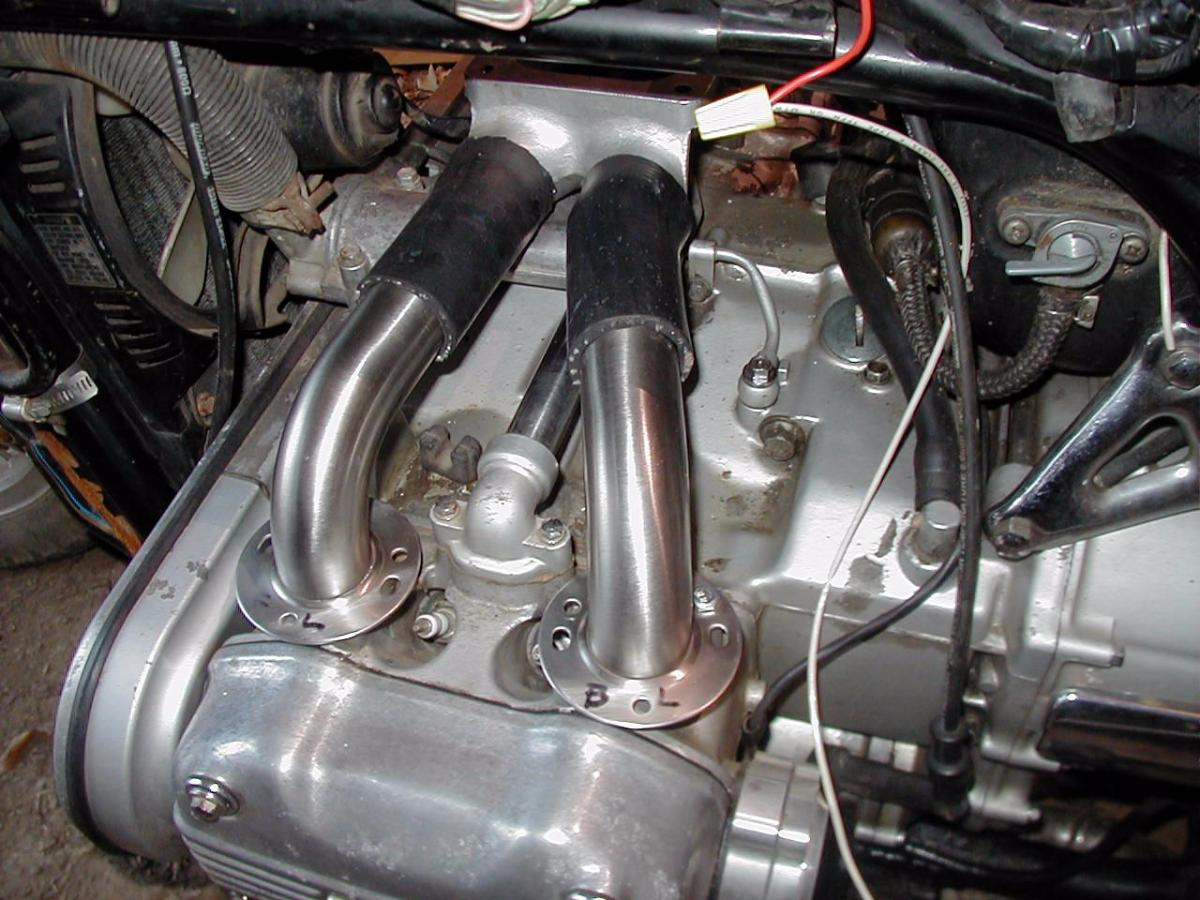
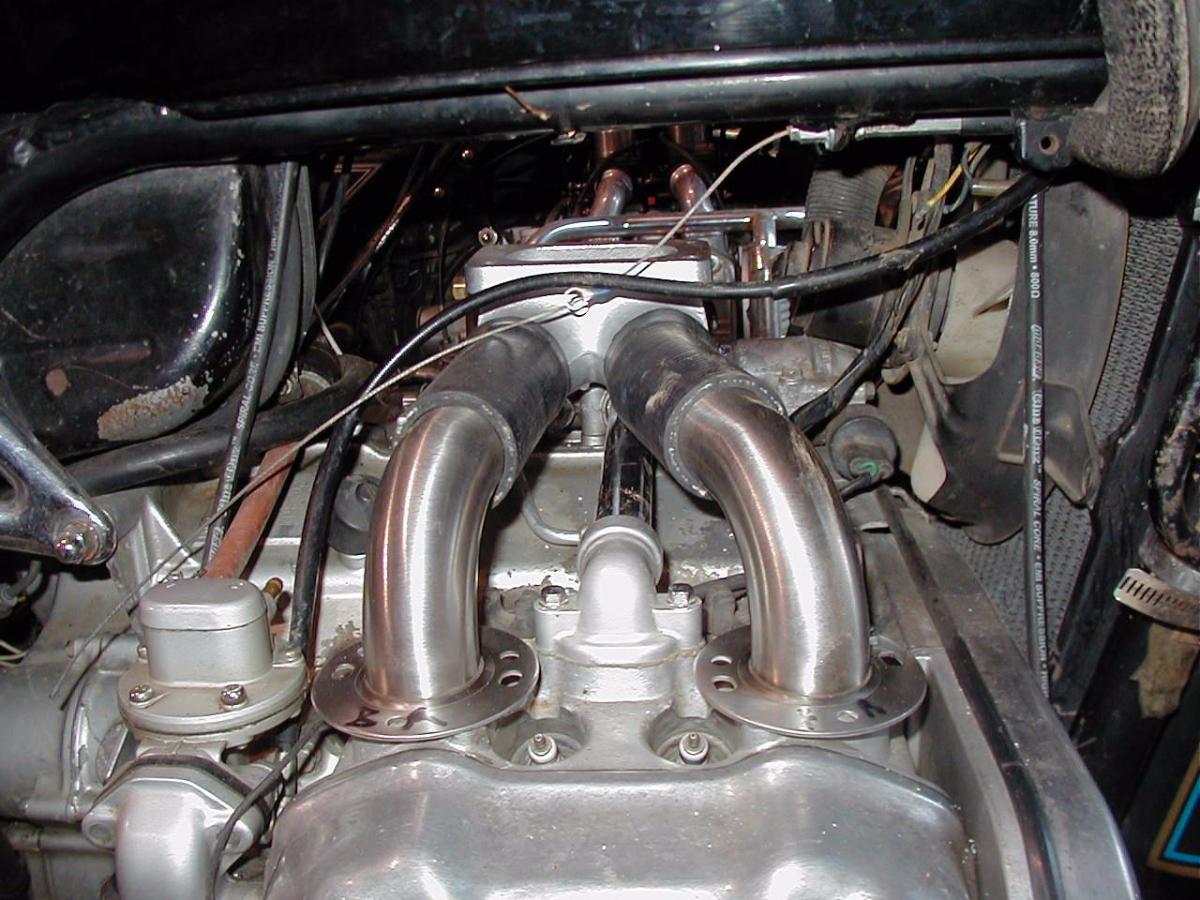
this shows the radiator hose connector ...it had bends in it I used at the best outlets to get tension free set up ....the runners are quite covered ...if this works out good I will buy some hose and finish it out to the heads .. seems like the best wrap one could have on the runners

I was able to elongate holes that were in grab bar already ...put a centering plug in the heads and get the marks for the cuts on runners there quite tight ... did all this with hand hack saw very good one snap on ...and chain saw file to elongate holes ....

as it is it is right on the thermostat housing ... when it on the bike this made the type4 non movable and rock solid I mat go with that ....we will see how it goes ...today ill be drilling second hole in runner flanges ... I did all the cutting by hand ...it was cold outside and runners and flanges are on the thin side ...about a 1/16" on flange and about 1/32 on runners ....so I took my time and just cut it smoothly and safe by hand ...... :builder: :mrgreen:
this shows the radiator hose connector ...it had bends in it I used at the best outlets to get tension free set up ....the runners are quite covered ...if this works out good I will buy some hose and finish it out to the heads .. seems like the best wrap one could have on the runners
I was able to elongate holes that were in grab bar already ...put a centering plug in the heads and get the marks for the cuts on runners there quite tight ... did all this with hand hack saw very good one snap on ...and chain saw file to elongate holes ....
as it is it is right on the thermostat housing ... when it on the bike this made the type4 non movable and rock solid I mat go with that ....we will see how it goes ...today ill be drilling second hole in runner flanges ... I did all the cutting by hand ...it was cold outside and runners and flanges are on the thin side ...about a 1/16" on flange and about 1/32 on runners ....so I took my time and just cut it smoothly and safe by hand ...... :builder: :mrgreen:


